

VDP002
2-Wire FHD 7" Colour Video Intercom with Wi-Fi
350.021UK
About this manual
This manual provides essential information for installing, operating, and maintaining your product. Please read and keep this manual to ensure the best performance from your purchase and to avoid damage resulting from improper use.
Introduction
This 2-wire video door phone lets you see and speak to visitors at your door from a 7" colour touchscreen indoors, or remotely on a smartphone or tablet through the TUYA Smart app. The weatherproof outdoor unit has a 1080p FHD camera with infrared night vision for clear colour images in any light, and connects to the indoor unit using just two cores of cable. From the indoor screen you can monitor the camera, hold a two-way conversation with your visitor, and release both an electric door lock and an electric gate.
Safety information
This section contains important safety instructions that must be followed to reduce the risk of injury, damage to the product, or damage to other equipment. Read all safety information before installing, operating, or servicing the product. Failure to follow these instructions may result in personal injury, property damage, or impaired product performance.
Warning
- To prevent the risk of fire or electric shock, keep the indoor unit and power supply away from rain and moisture. The outdoor unit is weatherproof (IP55), but must never be immersed in water or exposed to constant, direct moisture.
- If liquids are spilled on the indoor unit or power supply, stop using it immediately, allow it to dry out, and have it checked by a qualified person before further use.
- Avoid impact or heavy vibration to either unit.
- There are no user-serviceable parts inside either unit.
- Refer servicing to qualified service personnel.
General safety
- Do not install the indoor unit next to a television or other equipment that emits radio waves, as this may interfere with reception and signal quality.
- Some picture or sound interference may occur when a vehicle passes close to the outdoor unit during operation.
- Do not use the device if it is damaged in any way.
- Do not attempt to repair or dismantle the device under any circumstances — doing so will invalidate the warranty.
Placement
- Keep both units out of direct sunlight and away from heat sources.
- Keep the indoor unit away from moisture and dusty environments.
- Keep the outdoor unit away from constant, direct exposure to moisture.
- Do not place heavy objects on the indoor unit.
Cleaning
- Use a soft cloth with a neutral detergent to clean the housings as required.
- Clean the indoor unit's screen and the outdoor unit's camera lens with a dry, soft, lint-free cloth only.
- Do not use liquids or solvents on the screen or camera lens.
- A soft brush can be used to clear debris from either unit without causing damage.
Controls and features
Indoor unit
The indoor unit is operated from its 7" touchscreen. The home screen shows the main menu and status indicators.
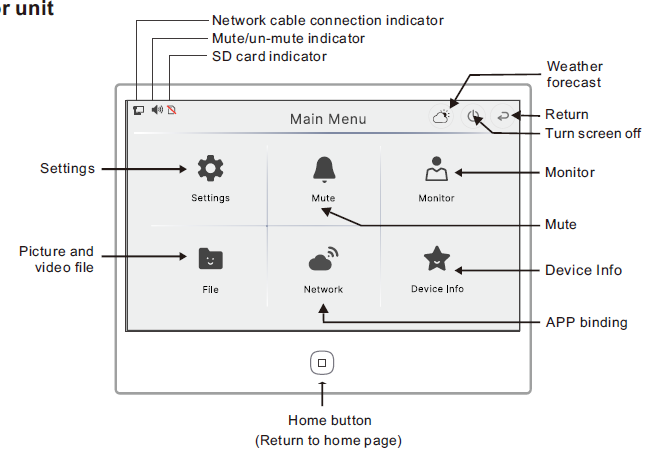
- Settings — ringtone, volume, unlock time, date/time, display and system options.
- Mute — silences the ringtone (also shown as the Don't disturb option).
- Monitor — shows the live camera image from the outdoor unit for up to 120 seconds.
- File — view and delete photos and videos stored on the TF card (card not supplied).
- Network — connect to a Wi-Fi network or display the QR code for pairing a smart device.
- Device Info — technical information such as IP address and storage details (also used for app binding).
- Status indicators along the top show the network connection, mute state, SD card, and weather forecast. Use Return to step back, Turn screen off to sleep the display, and the Home button below the screen to return to the main menu.
Outdoor unit
The outdoor camera call point is fitted with a rain shade for weather protection.
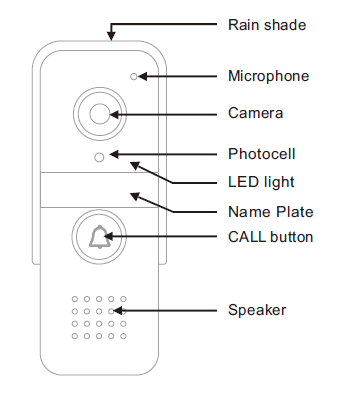
- Rain shade
- Microphone
- Camera
- Photocell (for automatic night vision)
- LED light
- Name plate
- Call button
- Speaker
Power requirements
Mains-powered
- Power supply: 100–240 V AC, 50/60 Hz, via the supplied power adapter (adapter output 15 V DC, 2 A).
- Use only the supplied or an approved power adapter.
Installation and setup
- Unpack the units and verify all supplied components are present.
- Mount the indoor and outdoor units as described below.
- Run the 2-core cable and connect both units as described under Connections.
- Connect the power supply to the indoor unit.
Mounting
Indoor unit
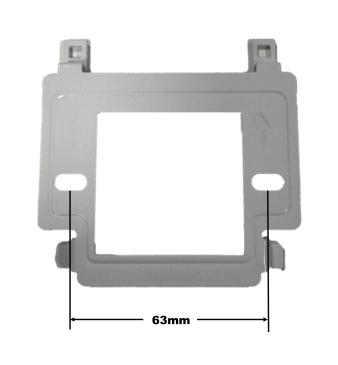
Fasten the fixing bracket for the indoor unit to the wall using the fixing kit provided. Use the screws and wall plugs if fixing straight onto the wall surface, or the fixing bolts if you are using a back-box. If using wall plugs and screws, drill two horizontally level 6 mm holes about 63 mm apart.
Outdoor unit
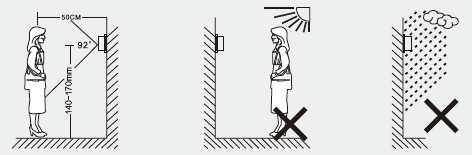
- Install the outdoor unit at a height of 1.4 m to 1.7 m from the ground, out of direct sunlight and away from constant exposure to moisture.
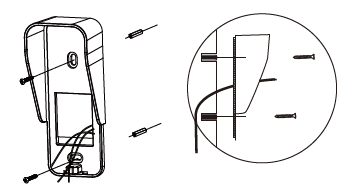
- Fasten the rain guard bracket in the chosen location using the screws and wall plugs provided, drilling two vertically aligned 6 mm holes about 82 mm apart.
- Run a length of 2-core cable between the indoor and outdoor units, securing it away from doors and walkways where it could be damaged.
- Connect the wires as described under Connections.
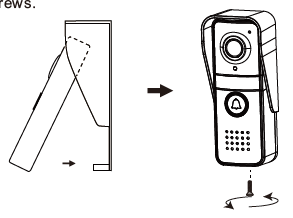
- Clip the unit into the rain guard bracket and secure it underneath with the small screw provided.
Connections
Use good-quality 2-core cable, choosing the diameter to suit the length of the run:
| Cable run | Minimum core size |
|---|---|
| Up to 15 m | 0.2 mm² |
| Up to 30 m | 0.5 mm² |
| Up to 50 m | 1.0 mm² |
| Up to 100 m | 1.5 mm² |
For an electric door lock or gate release, use 2-core 1.0 mm² cable up to a maximum distance of 5 m.
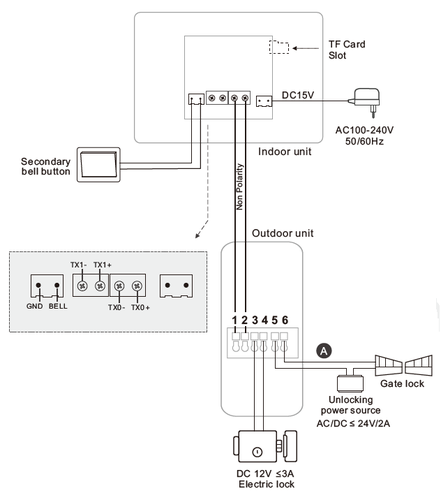
- Connect terminals 1 and 2 on both units as shown in the diagram above (these two cores are not polarity-sensitive).
- Terminals 3 and 4 on the indoor unit are for an electric door lock. Pressing the door release applies 12 V DC at up to 3 A.
- Terminals 5 and 6 on the indoor unit are voltage-free closing contacts rated at 2 A for an electric gate release. The gate release must have its own 24 V power supply; the contacts act as a switch when wired in series.
- Connect the power supply to the indoor unit and hang it on its fixing bracket.
Operation
Basic operation
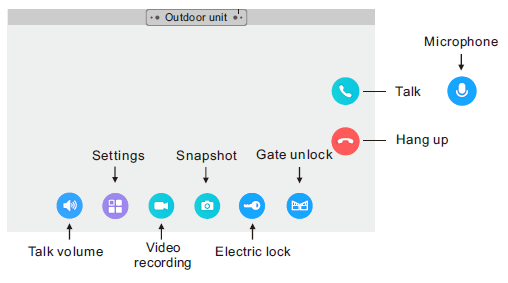
- When a visitor presses the call button on the outdoor unit, both the indoor unit and any paired smart device ring and show the visitor's image.
- Press Talk on the indoor unit or smart device to hold a two-way conversation with your visitor. Note: answering on the smart device immediately stops the indoor unit's ringtone.
- Press Electric lock (door release) and/or Gate unlock (gate release) to let your visitor in.
- Press Hang up to end the call at any time.
- Use the microphone button to mute or unmute the indoor unit's microphone.
- Use Snapshot to capture a still image of the live video feed.
- Use Video recording to record the live video feed.
- Use Settings to adjust image brightness, contrast, and colour.
- Use Talk volume to adjust the speech volume of the indoor unit.
Advanced functions
Settings menu
Open Settings on the indoor unit to adjust:
- Outdoor — select outdoor unit 1 or 2 when more than one is connected.
- Volume — set the ringtone volume of the indoor unit.
- Ringing Tone — choose from 16 available ringtones.
- Unlock delay time — set how long the electric lock stays released (1–10 seconds).
- Date/Time — set automatically over Wi-Fi, or manually.
- System Setting — set the unit as Master or slave when several indoor units are used; set Turn off screen sleep time (never / 30 s / 1 m / 2 m / 5 m); adjust the LED downlight colour and brightness; Format TF card; or Reset to factory defaults.
- Language — choose the interface language (English by default).
- Record — set incoming calls to save a photo or a video.
- Wallpaper — choose from 8 available wallpapers.
Connecting to Wi-Fi and the TUYA Smart app
- On the indoor unit, select Network, then WLAN at the top to list the available wireless networks.
- Select your network and enter the password to connect.
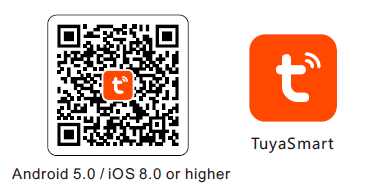
- On your smart device, scan the QR code above to download the TUYA Smart app, or search for it in the Apple App Store or Google Play.
- Register an account and log in.
- On the indoor unit, select Network again, then the QR code option at the bottom to display this device's code.
- In the TUYA Smart app, tap the "+" in the corner, choose "Scan", and scan the code shown on the indoor unit. The app should then add the device.
Note: the TUYA Smart app is updated frequently, so these steps may change over time.
Maintenance
- No regular maintenance is required.
- Inspect cables and connectors periodically.
Troubleshooting
If the unit does not operate as expected, consult the table below before contacting technical support. Many common issues can be resolved by checking connections, power sources, or settings.
Before proceeding
- Ensure the unit is installed and operated according to this manual.
- Verify that all connections are secure.
- Restore the unit to its default or minimum configuration, if applicable, before troubleshooting.
Before any maintenance
- Switch off the unit and disconnect it from the power source.
- Allow the unit to cool before handling.
- Do not remove covers or attempt internal repairs.
Common issues
The following table lists common issues and corrective actions that do not require opening the unit.
| Issue | Solution |
|---|---|
| No picture or signal | Ensure all connections are secure. Ensure the indoor unit is powered on. Ensure nothing is obstructing the camera lens. |
| No audio on the intercom | Turn up the unit volume. Ensure nothing is interfering with the speaker or camera on either unit. Ensure all connections are secure. |
| The outdoor unit cannot call the indoor unit | Ensure all connections are secure. |
| Door or gate release not working | Ensure all connections to the lock are secure. Ensure the lock has a power supply strong enough to operate it. |
| Visitor cannot hear you outside, but you can hear them | Press the talk button on the indoor unit to start the two-way intercom. Ensure all connections are secure. |
| Cannot connect the indoor unit to TUYA Smart | Ensure the indoor unit and your smart device are on the same 2.4 GHz wireless network. Ensure the indoor unit is within range of your router. |
Disposal and recycling
Dispose of this product in accordance with local environmental regulations. Do not dispose of electronic equipment with household waste.
Compliance
The outdoor unit is rated IP55 for protection against dust and low-pressure water jets.
Specification
| Specification | Value |
|---|---|
| Power supply | Input: AC100~240V 50/60Hz; Output: 15Vdc, 2A |
| Screen | 7" |
| Screen resolution | 1024 x 600 (RGB) |
| Camera resolution | 1080p |
| Talk time | 120 seconds max |
| Storage capacity | 128GB Max (TF card) |
| Power consumption | Standby <3W, Working >9W |
| Viewing angle | <=110° (horizontal); <=65° (vertical) |
| Transmission distance | 0~15m (0.2mm²); 0~30m (0.5mm²); 0~50m (1.0mm²); 0~100m (1.5mm²) |
| Operating temperature | -10°C~+50°C (indoor unit); -20°C~+50°C (outdoor unit) |
| IP rating | IP55 (outdoor unit) |
| Dimensions (indoor unit) | 174 x 118 x 22mm |
| Dimensions (outdoor unit) | 134 x 48 x 40mm |
| Weight (indoor unit) | 322g |
| Weight (outdoor unit) | 200g (inc. rain shade) |
Precautions
 |
CAUTION |  |
| RISK OF ELECTRIC SHOCK DO NOT OPEN | ||
| CAUTION : TO REDUCE THE RISK OF ELECTRIC SHOCK, DO NOT REMOVE COVER (OR BACK) NO USER-SERVICEABLE PARTS INSIDE REFER SERVICING TO QUALIFIED SERVICE PERSONNEL | ||
This symbol indicates that dangerous voltage constituting a risk of electric shock is present within this unit
This symbol indicates that there are important operating and maintenance instructions in the literature accompanying this unit
Safety Notice
- Prior to use, read through this safety guide.
- Pay attention to safety warnings.
- Observe all operating requirements.
- For any items designed for indoor use only, do not operate near water or in humid environments.
- For cleaning, only use a lint-free, dry cloth.
- Install according to the specifications.
- Place away from heat sources or heating appliances.
- During placement, ensure adequate support for the product and access to controls and connectors.
- Do not obstruct any cooling vents or openings and allow adequate space for air flow.
- Use only power connections supplied with the product or suitable equivalents.
- Do not modify the equipment in any way.
- For any mains powered appliances, ensure that the mains voltage is as described in the specifications.
- Keep powered products and batteries away from the reach of children.
- In case of malfunction, water ingress or other damage, consult qualified service personnel.
- Avoid pressure or impact to the housing that may result in damage when transporting or installing this product.
- For any Earthed mains product, ensure that the power supply has a protective Earth connection.
- Keep all packaging materials out of reach of children.

Disposal : The "Crossed Wheelie Bin" symbol on the product means that the product is classed as Electrical or Electronic equipment and should not be disposed with other household or commercial waste at the end of its useful life. The goods must be disposed of according to your local council guidelines.

AVSL Group Ltd, Unit 2 Bridgewater Park, Taylor Road, Manchester, M41 7JQ, Unitied Kingdom

AVSL (EUROPE) Ltd, Unit 3D North Point House, North Point Business Park, New Mallow Road, Cork, Ireland
