

WA-225
WA-225 Wall-Mount Amplifier with USB/SD, FM Tuner and Bluetooth
953.133UK
Introduction
Thank you for choosing the WA-225 wall amplifier as part of your sounmd installation. This multi-functional amplifier with inbuilt audio player is designed to provide playback of music and other audio with easy-to-use controls. Please read this manual in full and follow the instructions to gain the best results from your WA-225.
Warning
- To prevent the risk of fire or electric shock, do not expose any of the components to rain or moisture.
- If liquids are spilled on any component, stop using immediately, allow unit to dry out and have checked by qualified personnel before further use.
- Avoid impact or heavy vibration to any of the components.
- No user serviceable parts inside transmitter or receiver
- Refer servicing to qualified service personnel.
Safety
- This product is mains powered and should be installed by a qualified installer.
- Please follow local electrical installation safety regulations when connecting thsi product to a power supply.
Placement
- Keep the unit away from moisture or dusty environments.
- Ensure that there is adequate space for connections and ventilation at the rear of the housing.
- Use the back box provided where debris or insulating materials might compromise apertures at the rear of the unit.
Cleaning
- Use a soft cloth with a neutral detergent to clean the housing as required.
- A soft brush can be used to clear debris from the rear or underside of the unit without damaging it
- Do not use solvents for cleaning the surfaces
Connections & controls
Rear panel
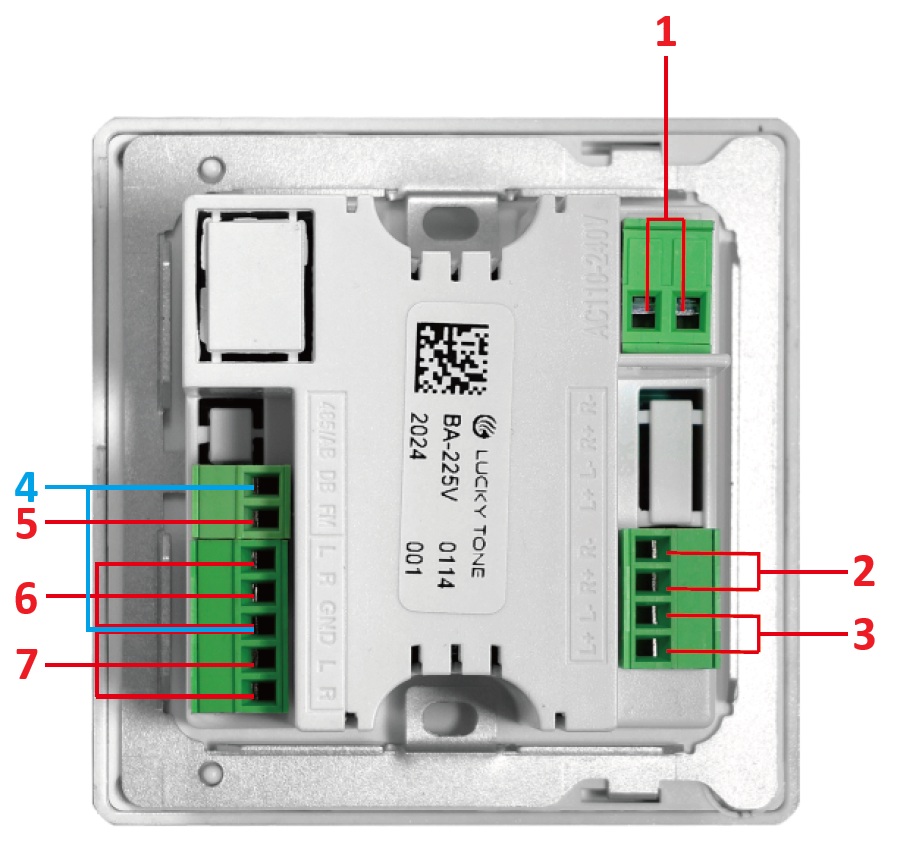
- Mains power input terminals: 110-240Vac 50/60Hz
- Right speaker output terminals +/-
- Left speaker output terminals +/-
- Doorbell switch terminals
- FM antenna terminals
- Aux line input terminals +/-/GND
- Line output terminals +/-/GND
Bottom edge
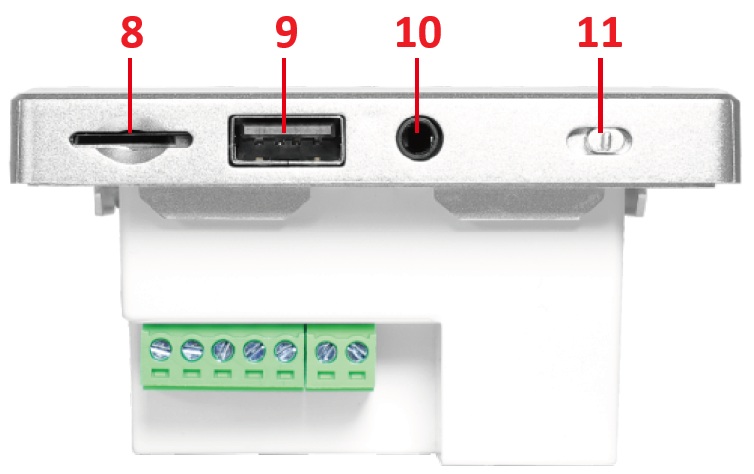
- MicroSD or TF card slot
- USB flash drive port
- 3.5mm Aux line input
- Power on/off switch
Front panel
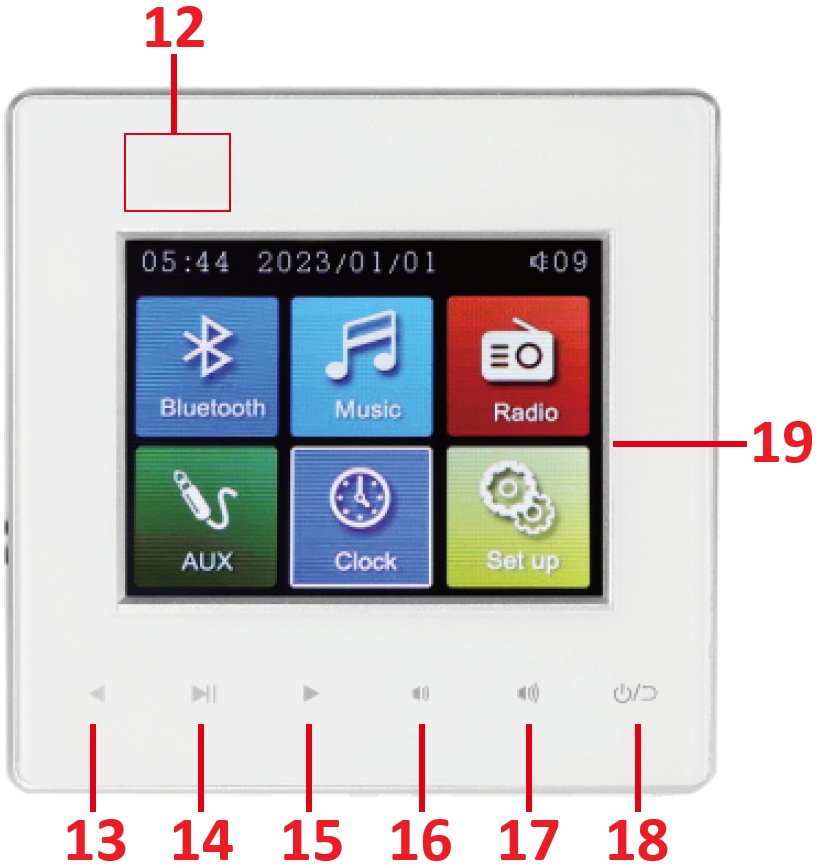
- I.R. remote receiver
- Previous track / channel
- Play / Pause
- Next track / channel
- Volume down (-)
- Volume up (+)
- Short press: return / long press: standby-on
- TFT colour display
Power requirements
- Power supply: 110-240Vac 50/60Hz
- Power consumption: 400mA max
- Connect using double-insulated cable 0.5mm² minimum
Installation and setup
Unpack the unit and verify all supplied components are present. WA-225 wall amplifier 80 x 80 x 50mm back box Steel installation plate Installation screws Mini terminal screwdriver I.R. remote control 2 x AAA batteries
The WA-225 amplifier can be installed into back box of at least 47mm internal depth within a wall cavity. The steel installation plate shoudl be screwed in place in the back box or directly into the cavity if there is no chance of debris ingress. Ensure that the tabs are at the bottom and side hooks are pointing upwards. All wiring terminals on the WA-225 rear panel are Euroblock type and can be removed for easier connection.
Note: Isolate the mains supply before attempting to connect any Live or Neutral wires to the WA-225
For power connection, follow the local mains wiring safety requirements. Insulate and protect any mains power wiring through the back box and to the unit. Strip back 5-6mm of the insulation and twist the strands to ensure a good connection in each terminal. Unscrew each terminal firstly to open the clamp and insert the wires fully before screwing firmly in place.
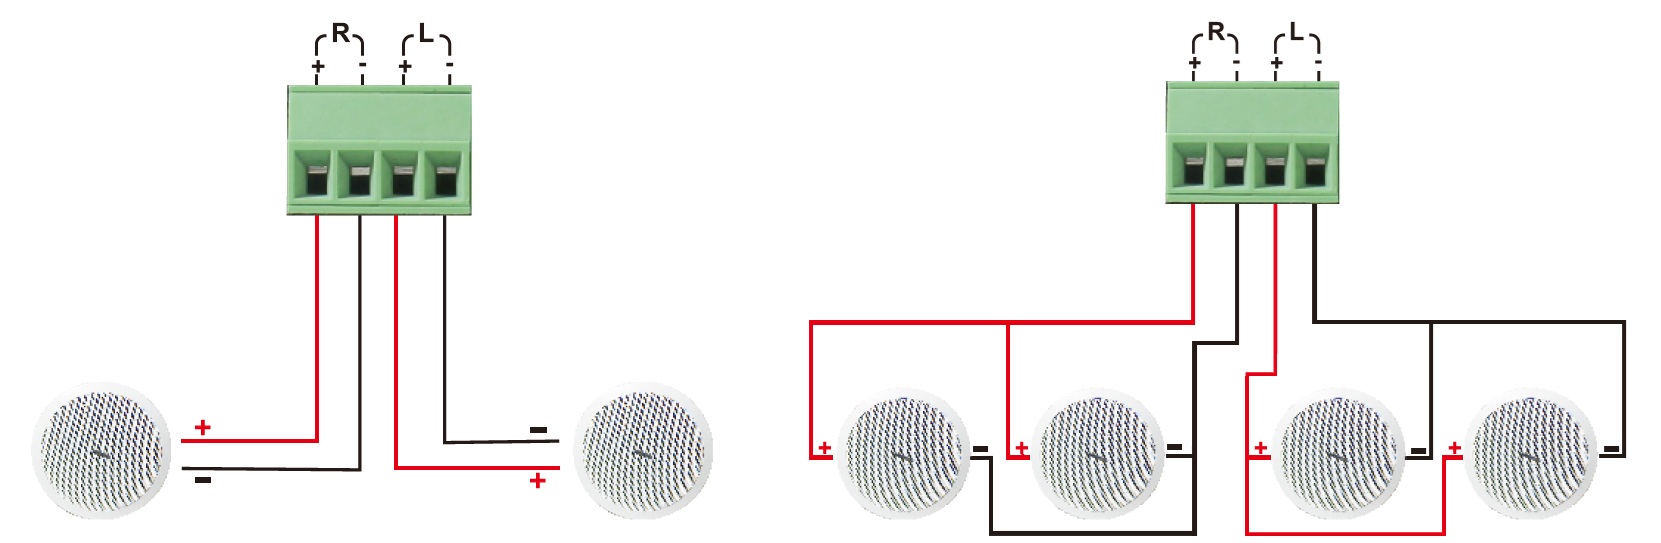
For speaker connections, the minimum load on each output is 4Ω, delivering 25W into this load, or 15W to each output on an 8Ω load. - If 2 speakers are needed, connect a single 8Ω speaker to each output that has a power handling of 15W or more. - If 4 speakers are needed, connect a two 8Ω speakers to each output, each with a power handling of 12.5W or more. - Note: parallel wiring means all positive (+) wires connected together and all negative (-) wires connected together.
An auxiliary (Aux) line input can be connected with 2-core shielded cables. connecting the shield (braid) to Ground (GND) and Left and Right cores connected to L and R terminals. Likewise, a line output can be wired from the L and R line out terminals with the shield (braid) connected to the same GND. This line output can be fed onto further amplifiers to power additional speakers.
The same Ground point (GND) should be used when connecting an FM antenna, with the core connected to the FM terminal.
Lastly, a doorbell switch can be connected across the DB terminal and GND to deliver a doorbel sound when pressed.
Once all terminals are wired, re-connect any removed terminals into the rear panel, ensuring they are in the correct sockets. Insert the WA-225 into the steel installation plate and slide down onto the side hooks to secure the amplifier in place. (the WA-225 will only fix in place the correct way round, so ensure the plate is mounted correctly)
Powering up
Once all connections are made and the WA-225 is securely installed, the mains power can be reinstated from the supply. Switch on power to the WA-225 by sliding the power switch on the bottom edge to the right. The display will light up.
Operation
On power-up, after a brief welcome screen, the main menu is displayed with 6 options. Bluetooth / Music / Radio / AUX / Clock / Setup These can be navigated by tapping the Previous (<) and Next (>) buttons. Holding the Previous (<) and Next (>) buttons enables fast search through the current track. Tapping Play/Pause (>II) will select the highlighted option. Tapping the "return" button (far right side) will return to the main menu. Note: the WA-225 display is not a touch screen
Bluetooth
To stream music wirelessly from a smartphone or tablet, select the Bluetooth menu . Initially, the display should state that it is "Disconnected" From the Bluetooth menu in the smartphone or tablet, search for "adastra XXXX" (Where XXXX is a serial number) Select to connect and enter the 4 digit pairing code shown on the WA-225 display. When pairing is successful, the display will show the sending device and "Pause" or "Playing" with the track title. The Previous (<) and Next (>) buttons can remotely select the track on the sending device and Play/Pause (>II) can play or pause the track remotely. The Volume up (+) and Volume Down (-) buttons will affect the playback volume.
USB / microSD playback
To initiate playback of mp3, wav, wma, ape, or flac format audio tracks, insert a microSD or USB flash drive into the relevant port on the bottom edge of the WA-225. The most recent (either USB or microSD) that was inserted will playback automatically. The flash memory device (USB or microSD) should be 32GB max. and formatted to FAT32. The Previous (<) and Next (>) buttons can navigate through the tracks on the sending device and Play/Pause (>II) will play or pause the track. The Volume up (+) and Volume Down (-) buttons will affect the playback volume. Tapping the "return" button reverts to the main menu. When selecting Music from the main menu, if a USB or microSD card are already inserted, playback will start automatically. If both types are inserted, playback will be from USB first and microSD second.
FM radio tuner
When selecting Radio from the main menu, the display will show a radio frequency in MHz (MegaHertz) This is the frequency of the radio station that it is currently tuned into. An FM antenna should be connected for good reception. On first operation, it is recommended to hold the Play/Pause (>II) button to initiate auto-tuning, which sweeps through all the tuneable frequncies to seek out the strongest signal (i.e. FM radio stations) and store them as channels (CH1, CH2, CH3… etc.) A short tap of the Play/Pause (>II) button mutes or un-mutes the radio output. When the channels are stored, they can be navigated via the Previous (<) and Next (>) buttons. The Volume up (+) and Volume Down (-) buttons will affect the playback volume.
AUX
As detailed above, an Auxiliary line input can be wired into the AUX terminals at the rear of the WA-225. This can be a stereo line input from a CD player, an mp3 player, automated message device or Selecting AUX from the main menu switches the audio to the signal input on the AUX terminals. Volume is controlled in the same way as other sources using the Volume up (+) and Volume Down (-) buttons. The Play/Pause (>II) button can mute or unmute the output to the speakers. Another method for AUX input is by inserting a stereo 3.5mm plug into the AUX jack on the bottom edge. This will automatically switch the WA-225 into Auxiliary line input mode.
Clock
Selecting Clock from the main menu Will display the current time as set in the "Settings" menu, with date and day at the top of the display. The main menu will automatically revert to the clock display as a screensaver if there is no button pressed within 15 seconds.
Settings
Selecting the settings menu opens a list of 7 options as described below. Tap Play/Pause (>II) to select an option. Hold Play/Pause (>II) to save the settings and exit the option. Use Previous (<) and Next (>) to adjust the values.
- BT name: Edit the first 4 letters of the Bluetooth ID name if required.
- PIN CODE: Edit the Bluetooth PIN if required.
- Language: Select between English or Chinese language.
- Time and Alarm: Set the system time and date. There are also 4 alarms with sub-settings for on/off, cycle (i.e. repeats), and time.
- Start VOL: Set the playback volume at power-up
- Auto power on off: Set scheduler on/off. Set Auto power-up on/off. Set auto power-down on/off. When timer is set, hold the "return" button to standby and the schedule will start.
- Exit: Returns from the settings menu to the main menu.
Remote Control
The WA-225 is supplied with an IR remote handset, which enables remote control of many of the menu and navigation functions, including some extra additions. Each remote button is labelled as per its function. Below are some further descriptions to elaborate on the operation. Insert 2 AAA batteries into the remote control rear compartment, observing the polarioty as printed inside.
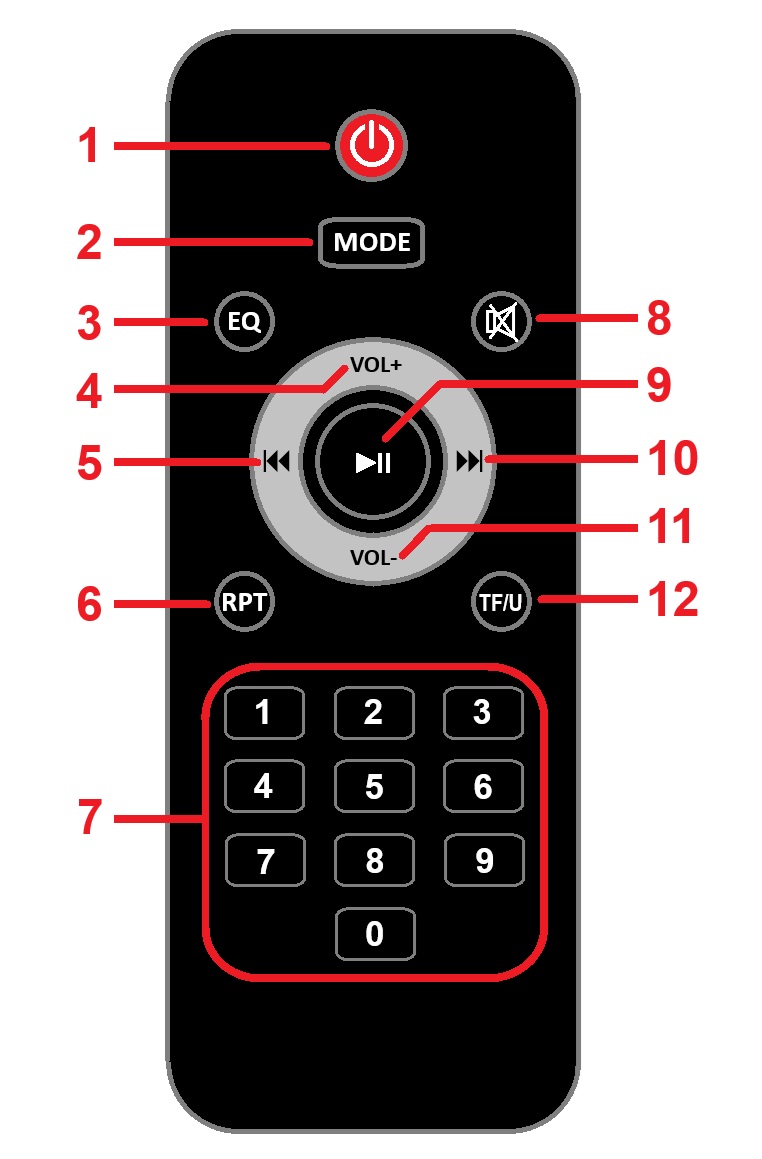
- Power on / standby
- MODE select: Choose the input source - Bluetooth / USB / microSD / FM tuner / AUX
- EQ setting: steps through NORMAL, POP, ROCK, JAZZ,CLASSICAL, COUNTRY
- VOL+ volume up
- Previous track or station
- RPT setting: Repeat All tracks - or - Repeat 1 track (i.e. current track)
- Numerical input keys: tap in the required track number for direct access
- Mute key: press to mute or unmute output
- Play/Pause or enter.
- Next track or station
- VOL- volume down
- TF/U: Toggle between miccroSD or USB media playback
Maintenance
- No regular maintenance is required.
- To clean any of the components, use a dry or slightly damp cloth on the front panel only.
- If debris covers the rear vents, disconnect from the mains and clear with a softy brush.
- Switch the unit off via the bottom slide switch if not being used for long periods.
Troubleshooting
If the unit does not operate as expected, consult the table below before contacting technical support. Many common issues can be resolved by checking connections, power sources, or settings.
Before proceeding
- Ensure the unit is set up and operated according to this manual.
- Verify that all connections are secure.
- Restore the unit to its default or minimum configuration, if applicable, before troubleshooting.
Before any maintenance
- Switch off the unit and disconnect it from the mains.
- Ensure the components are dry.
- Do not remove covers or attempt internal repairs.
Common issues
The following table lists common issues and corrective actions that do not require opening the unit.
| Issue | Solution |
|---|---|
| No power | Check mains power supply and power switch are on |
| Power on but no display | Check standby status; check timer schedule |
| No playback of USB or microSD | Must be FAT32 no larger than 32GB; check audio file format |
| No Bluetooth pairing | Check for correct BT ID and PIN code |
| No Bluetooth playback | Check Play controls on WA-225 and sending device |
| BT playback but no output | Check volume and mute settings on WA-225 and sending device |
| FM tuner not picking up stations | Check FM antenna placement and connection |
Disposal and recycling
Dispose of this product in accordance with local environmental regulations. Do not dispose of electronic equipment with household waste.
Compliance
This product complies with applicable safety and EMC standards.
Specification
| Specification | Value |
|---|---|
| Power supply | 110-250Vac 50/60Hz (screw terminals) |
| Output power @ 4 ohms | 2 x 25W |
| Output power @ 8 ohms | 2 x 15W |
| Inputs | microSD slot, USB-A port, 3.5mm Aux jack |
| Terminals | L+N power, Doorbell, Aux L+R in/out, Speaker out L+R, GND, FM |
| Modes | mp3, Bluetooth, FM tuner, Aux in |
| Audio format | mp3, wma, wav, aac, waw, ape |
| USB/SD player | 32GB max. FAT32 |
| Bluetooth range | Up to 10m |
| THD | 0.03% (1W/1m) |
| SNR | 98dB |
| Frequency response | 20Hz-20kHz (±2dB) |
| Mounting depth | 37mm (no back box) |
| Dimensions | 86 x 86 x 50mm (inc. back box) |
| Weight | 224g (inc. back box) |
Precautions
 |
CAUTION |  |
| RISK OF ELECTRIC SHOCK DO NOT OPEN | ||
| CAUTION : TO REDUCE THE RISK OF ELECTRIC SHOCK, DO NOT REMOVE COVER (OR BACK) NO USER-SERVICEABLE PARTS INSIDE REFER SERVICING TO QUALIFIED SERVICE PERSONNEL | ||
This symbol indicates that dangerous voltage constituting a risk of electric shock is present within this unit
This symbol indicates that there are important operating and maintenance instructions in the literature accompanying this unit
Safety Notice
- Prior to use, read through this safety guide.
- Pay attention to safety warnings.
- Observe all operating requirements.
- For any items designed for indoor use only, do not operate near water or in humid environments.
- For cleaning, only use a lint-free, dry cloth.
- Install according to the specifications.
- Place away from heat sources or heating appliances.
- During placement, ensure adequate support for the product and access to controls and connectors.
- Do not obstruct any cooling vents or openings and allow adequate space for air flow.
- Use only power connections supplied with the product or suitable equivalents.
- Do not modify the equipment in any way.
- For any mains powered appliances, ensure that the mains voltage is as described in the specifications.
- Keep powered products and batteries away from the reach of children.
- In case of malfunction, water ingress or other damage, consult qualified service personnel.
- Avoid pressure or impact to the housing that may result in damage when transporting or installing this product.
- For any Earthed mains product, ensure that the power supply has a protective Earth connection.
- Keep all packaging materials out of reach of children.

Indoor use only : The "House" symbol identifes electrical equipment designed primarily for indoor use.

Disposal : The "Crossed Wheelie Bin" symbol on the product means that the product is classed as Electrical or Electronic equipment and should not be disposed with other household or commercial waste at the end of its useful life. The goods must be disposed of according to your local council guidelines.

AVSL Group Ltd, Unit 2 Bridgewater Park, Taylor Road, Manchester, M41 7JQ, Unitied Kingdom

AVSL (EUROPE) Ltd, Unit 3D North Point House, North Point Business Park, New Mallow Road, Cork, Ireland


