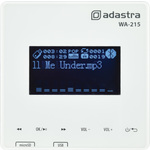
WA-215
WA-215 Wall Mount Amplifier + Media Player with Bluetooth
953.132UK
Introduction
Thank you for choosing the Adastra WA-215 in-wall amplifier for your discreet audio installation. This unit is designed to power wall or ceiling mounted speakers and receive audio via Bluetooth. Please read this manual to gain the best results from your product and avoid damage through misuse.
Version 1.0
Item ref: 953.132UK, 953.137UK
Caution: Please read this manual carefully before operating Damage caused by misuse is not covered by the warranty
Warning
To prevent the risk of fire or electric shock, do not expose any components to rain or moisture. If liquids enter the housing, stop using immediately, allow unit to dry out and have checked by qualified personnel before further use. Avoid impact, extreme pressure or heavy vibration to the case.
No user serviceable parts inside – Do not open the case – refer all servicing to qualified service personnel.
Safety
• This product is powered directly from the mains supply and should only be fitted by a qualified electrical installer.
Placement
The WA-215 can be installed into a partition wall using the supplied pattress box.
The WA-215 can be surface mounted if necessary, using the supplied back box.
Ensure adequate ventilation and keep away from combustible material or moisture.
Ensure that the WA-215 is within range of the sending device if using Bluetooth.
Do not set the panel fully into the wall and ensure adequate access to the bottom edge.
Cleaning
Use a soft cloth with a neutral detergent to clean the housing as required.
Do not use solvents for cleaning the unit.
Loudspeaker Installation
The WA-215 wall amplifier is available separately or as a WA-215-SET.
If supplied as a WA-215-SET, there are 2 ceiling speakers supplied.
The speakers may be installed into a plasterboard or tiled ceiling with at least 80mm to accommodate the mounting depth of each speaker.
The speakers should be wired to the WA-215 amplifier using standard twin speaker cable.
10m of suitable cable is supplied with the WA-215-SET and should be cut as required.
 Carefully mark out and cut a hole 170mm diameter
for each speaker.
Carefully mark out and cut a hole 170mm diameter
for each speaker.
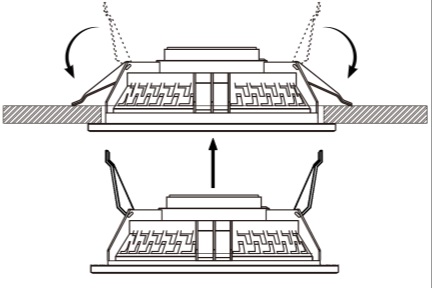
Feed the speaker wires from each hole to the WA-215 (passing through the back box)
Connect the + and - wires from the WA-215 speaker outputs to the 8Ω and COM screw terminals and offer the speaker to the hole in the ceiling with the spring clamps either side of the magnet pressed fully up to fit through the hole. The spring clamps will fold back down to hold the speaker in place. (see opposite)
If the WA-215 is supplied without speakers, ensure that the load to be connected to each speaker output has no lower than 8Ω impedance and has a power handling of 15W max.
Do not connect further speakers as this can cause damage to the WA-215 amplifier circuitry.
Back Box Installation
The WA-215 is supplied with a single gang 60mm deep back box and mounting plate for flush mounting or surface mounting to a wall. Install the back box to the chosen location and knock out any of the pre-punched discs in the sides for cable access as required.
Screw the mounting plate into the front of the back box and feed power, speaker, trigger and signal wires through the back box to the WA-215 and connect to the relative terminals.
(see “Connections” on the next page)
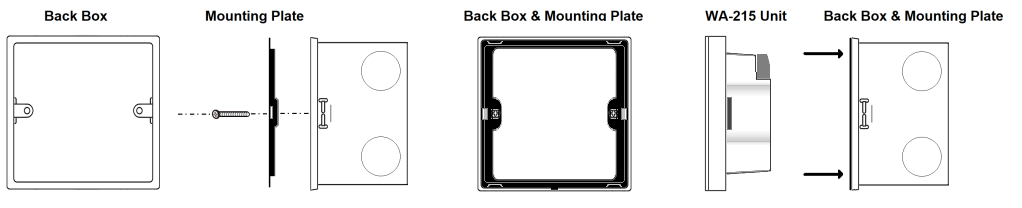 Alternatively, the mounting plate can be fitted
into a standard 86 x 86mm pattress box top accommodate the WA-215, so
long as there is a minimum 47mm mounting depth
Alternatively, the mounting plate can be fitted
into a standard 86 x 86mm pattress box top accommodate the WA-215, so
long as there is a minimum 47mm mounting depth
Connections
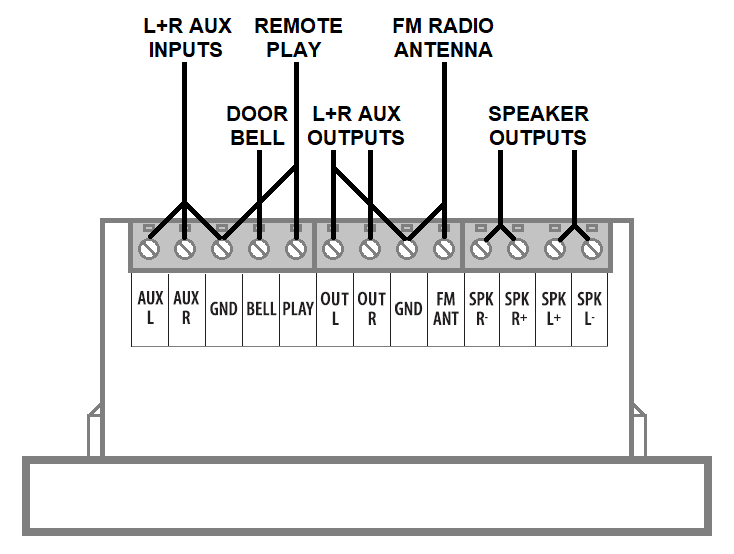
Connections to the WA-215 are made using the Euroblock screw terminals at the rear.
These terminals may be unplugged for convenience when inserting the wiring to them.
Ensure all speaker, FM aerial, remote play/doorbell, AUX input and isolated mains wiring is already fed through the wall and through the back box ready for connection to the WA-215 rear panel.
Connect left and right speaker wires to the relevant “+/-” terminals on the WA-215.
For better FM reception, an aerial may be connected to the FM ANT and GND terminals.
A line level input from an external audio source may be connected to the AUX terminals. These should be fed from the audio source to the WA-215 using shielded 2-core cable.
Connect Left+ and Right+ to the AUX L & R terminals and both Left- and Right- to GND.
Similarly, L+R Aux line output can be connected to further equipment via the OUT terminals.
For remote play/pause control, a momentary switch may be connected between the REMOTE PLAY and GND terminals. Likewise, a doorbell function is available by connecting a momentary switch between the DOORBELL and GND terminals.
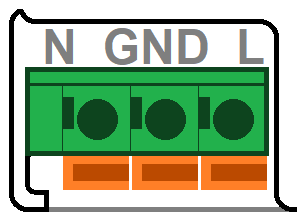
Finally, with the mains isolated, connect 230Vac mains to the power terminals marked “N GND L” on the rear of the WA-215.
Connect Live to “L”, Neutral to “N” and Earth to “GND”
Push in the orange spring grips using a screwdriver, insert the stripped wire and release the orange grip to secure the connection.
Feed the wiring carefully into the wall cavity to take up any excess, rather than compressing it inside the back box, which may damage the wire and connections. Push the WA-215 unit firmly onto its mounting plate to fix into the back box or wall cavity. Keep the mains power isolated (off) until the WA-215 is fully installed into the wall, covering the rear panel wiring.
If any function is not operating correctly once installed, isolate the mains power again before removing the WA-215 unit from the wall or back box.
To remove the WA-215 from the mounting plate, insert a screwdriver in the bottom centre, lever the faceplate forwards and carefully prize the edges of the WA-215 away from the mounting plate.
Re-check connections and replace the WA-215 before switching the mains power back on.
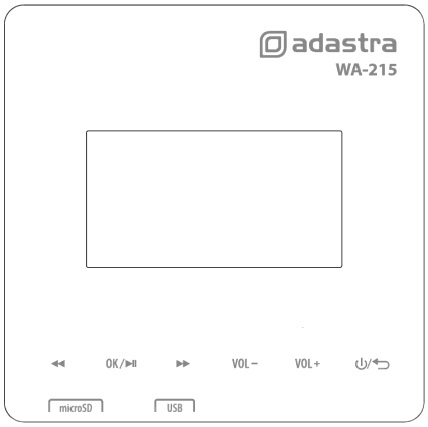
Front Panel
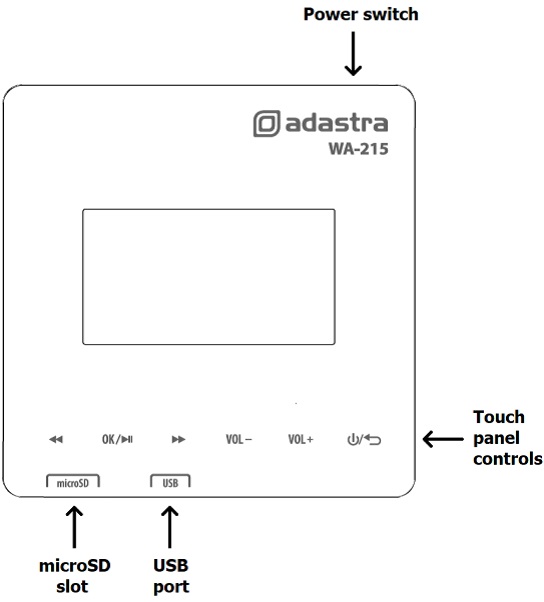
- revious track/station
- Play/Pause / BT Mute / Select
- Next track/station
- VOL- Decrease volume level
- VOL+ Increase volume level
- Return / Hold = Power
Bottom Edge

Operation
To power up the WA-215, slide the power switch on the top edge to the left position.
The LCD screen will light up and show the welcome message (unless USB or SD media are connected). Touch the Return key to enter the menu.
The bottom edge of the WA-215 is home to a microSD slot and a USB port for inserting memory devices containing digital audio files to be played via the internal media player.
The front panel is completely flat with a row of touch-operated controls below the display.
A brief description of each of these controls is given above.
Control is available from the front panel or via the supplied I.R. remote control handset.
Insert 2 x AAA batteries into the rear compartment to use this remote.
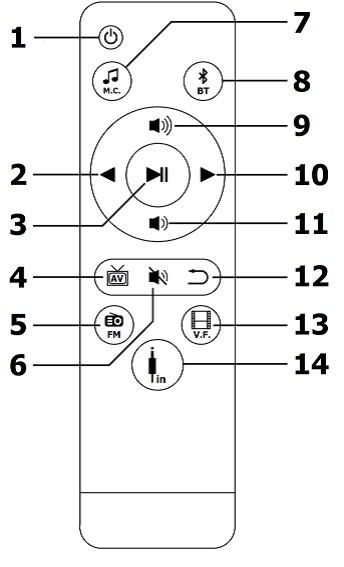
| No | Function |
|---|---|
| 1 | Power on/off |
| 2 | Previous track/station/option |
| 3 | Play/Pause / BT Mute / Select |
| 4 | - Not used - |
| 5 | FM tuner mode |
| 6 | Mute output |
| 7 | Music (USB/microSD) playback |
| 8 | Bluetooth Mode |
| 9 | Volume + |
| 10 | Next track/station/option |
| 11 | Volume - |
| 12 | Return |
| 13 | - Not used - |
| 14 | Line input mode |
Remote Control
Main Menu
To access the main menu from power up or playback, touch or press the Return key until the set of icons shown below is displayed.

Use the Previous and Next keys to navigate through the menu options and press Play/Pause to select the required option.
Each icon has a sub menu which are described in each section on the following pages.
MSC (music) USB/SD Player
Insert a microSD or USB stick to the ports on the bottom edge of the faceplate and playback of audio files will begin automatically. If this does not happen, ensure that the media is formatted to FAT32 and the files stored onboard are supported types (see Specifications).
If the main menu screen is displayed, select the MSC option or press M.C. on the remote.
Note: If both microSD and USB media are connected, the last connected will take priority.
Touching Play/Pause on the face plate or remote will start or temporarily stop playback and stored tracks can be navigated using the Previous Track and Next Track keys.
The output volume level is adjusted using the Volume + / - buttons.
Playback Options
Holding the Play/Pause key on the faceplate during playback will enter the playback menu.
Use Previous and Next keys to navigate options and Play/Pause to select.
| Repeat | Equalizer | Local Folder | Delete File | Return |
| Repeat All | Natural | Root | Press Play/Pause to delete current track | |
| Repeat One | Rock | System Volume | ||
| Repeat Folder | Pop | Track number select | ||
| Random | Classic | |||
| Return | Jazz | |||
| Country | ||||
| Return |
Pressing the Return key returns to playback.
Pressing Return again reverts to main menu.
B/T Wireless Mode
The WA-215 may be paired to a smart phone or tablet via Bluetooth mode for wireless playback. From the main menu, navigate to the second icon named “BT” and press Play/Pause. A musical note and the “B” logo will appear on the screen.

Enable Bluetooth on the sending device and search for the device ID “Adastra WA-215”. Select to pair with “Adastra WA-215” and when connected, an arrow is displayed pointing to another musical note to confirm that the connection is successful.
Play audio tracks on the sending device and check for output on the connected speakers.
Ensure that the volume level on the sending device is not set too low or at zero.
Press Play/Pause to pause or continue playback. The display shows “MUTE” when paused.
Previous and Next keys on the WA-215 will remotely navigate tracks on the sending device.
Press “Volume +” to increase volume or “Volume -” to decrease volume.
Pressing Mute on the remote will also mute or un-mute the output.
Touching the Return key exits the Bluetooth mode and disconnects from the sending device.
Enabling Bluetooth mode with a paired device in range will re-connect automatically.
FM Tuner
The WA-215 also has a built-in FM radio tuner. For best reception, it is advised to connect an FM antenna via the terminals at the rear of the main unit.
From the main menu, navigate to the FM icon and touch Play/Pause or press the FM button on the remote. The display will show “FM”, the channel number and its FM frequency.
To initiate auto-tune to find available radio stations, touch and hold the Play/Pause key.
The FM tuner will sweep through FM frequencies and store the strongest signals as pre-set channels. After auto-tuning, the Previous and Next keys will step through stored channels.
A short press on the Play/Pause key will mute or un-mute the FM tuner output.
(a long press will re-tune all available channels again)
Press “Volume +” to increase volume or “Volume -” to decrease volume.
Touching the Return key exits the FM mode and reverts to the main menu.
Line Input
The terminal connections on the rear of the main unit include a stereo auxiliary line input, as described in the “Connections” section. To enable this input through the WA-215 amplifier from the main menu, navigate to the icon named “LIN” (line input) and a picture of a stereo phone plug will be displayed.
Press “Volume +” to increase volume or “Volume -” to decrease volume.
Pressing Play/Pause (or Mute on the remote) will mute or un-mute the output.
Touching the Return key exits the FM mode and reverts to the main menu.
System Menu
From the main menu, navigate to the SYS icon (far right) and touch Play/Pause.
Use Previous and Next to navigate options and Play/Pause to select from the options below.
| Backlight | Language | Contrast | Firmware Ver. | Return |
| 0 sec. | English | 0 - 19 | Firmware version No. | |
| 10 sec. | Return | |||
| 0 sec. | ||||
| 1 min. | ||||
| 2 min. | ||||
| 5 min. | ||||
| 10 min. | ||||
| Return |
Backlight adjusts the time that the LCD backlight stays lit after no keys are pressed/touched.
Note: a value of “0” seconds means that the backlight will stay lit and not switch off.
Contrast adjusts the brightness depth of the LCD display via a sliding bar setting.
Firmware Ver. Displays the firmware version of the WA-215
Specification
| Specification | Value |
|---|---|
| Power supply | 100-240Vac, 50/60Hz (euroblock terminals) |
| Output | 2 x 15W @ 8 ohms (euroblock terminals) |
| Audio source | USB / microSD player, FM tuner and Bluetooth receiver |
| Auxiliary input | Left + right line in (euroblock terminals) |
| Audio format | mp3, wma, wav |
| FM : tuning range | 87.5 - 108MHz |
| Bluetooth range | Up to 10m |
| Bluetooth version | 4.1 |
| Frequency response | 20Hz - 20kHz (±3dB) |
| THD | <0.03% at 1kHz, 1W |
| S/N ratio | >98dB |
| Trigger | Remote playback and door bell (euroblock terminals) |
| Mounting depth | 47mm (with adequate ventilation), 57mm back box supplied |
| Dimensions | 86 x 86 x 50mm |
| Weight | 150g |
Precautions
| CAUTION | ||
| RISK OF ELECTRIC SHOCK DO NOT OPEN | ||
| CAUTION : TO REDUCE THE RISK OF ELECTRIC SHOCK, DO NOT REMOVE COVER (OR BACK) NO USER-SERVICEABLE PARTS INSIDE REFER SERVICING TO QUALIFIED SERVICE PERSONNEL | ||
This symbol indicates that dangerous voltage constituting a risk of electric shock is present within this unit
This symbol indicates that there are important operating and maintenance instructions in the literature accompanying this unit
Safety Notice
- Prior to use, read through this safety guide.
- Pay attention to safety warnings.
- Observe all operating requirements.
- For any items designed for indoor use only, do not operate near water or in humid environments.
- For cleaning, only use a lint-free, dry cloth.
- Install according to the specifications.
- Place away from heat sources or heating appliances.
- During placement, ensure adequate support for the product and access to controls and connectors.
- Do not obstruct any cooling vents or openings and allow adequate space for air flow.
- Use only power connections supplied with the product or suitable equivalents.
- Do not modify the equipment in any way.
- For any mains powered appliances, ensure that the mains voltage is as described in the specifications.
- Keep powered products and batteries away from the reach of children.
- In case of malfunction, water ingress or other damage, consult qualified service personnel.
- Avoid pressure or impact to the housing that may result in damage when transporting or installing this product.
- For any Earthed mains product, ensure that the power supply has a protective Earth connection.
- Keep all packaging materials out of reach of children.
Disposal : The "Crossed Wheelie Bin" symbol on the product means that the product is classed as Electrical or Electronic equipment and should not be disposed with other household or commercial waste at the end of its useful life. The goods must be disposed of according to your local council guidelines.
AVSL (EUROPE) Ltd, Unit 3D North Point House, North Point Business Park, New Mallow Road, Cork, Ireland