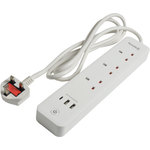
WF-E3
3-Gang WiFi Smart Power Strip with USB and Surge Protection
350.155UK
Introduction
Take smart control of your home devices with this easy to setup Mercury WiFi power strip. 3 smart sockets that can be separately managed and 3 always-on USB ports with surge protection to shields sensitive electronics and appliances from sudden power surges and spikes. Turn your devices on and off, check their status, create schedules and set timers from anywhere using your smart phone or tablet and the installed Tuya application. Also use your voice to control any connected device by pairing with Alexa, Google Assistant or Samsung Smart Things.
Features
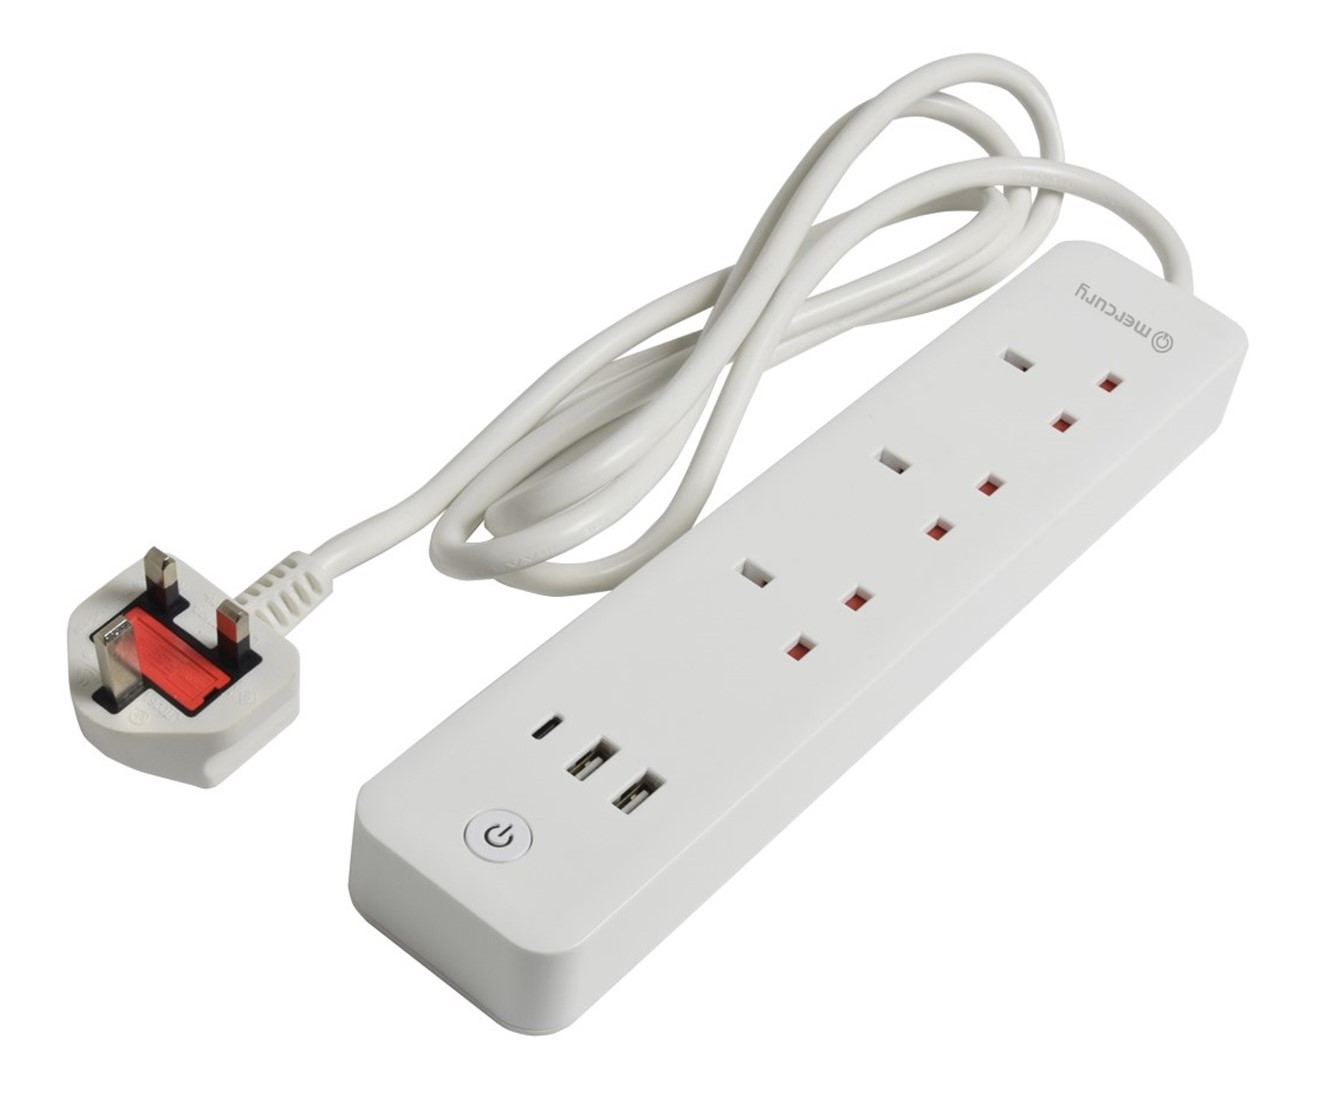
3 Smart sockets that can be individually controlled by smart phone application or Alexa, Google Home or Samsung Smart Things
3 Always-on USB ports including a single 2.4A Type-C and 2x 1.0A USB Type-A
Surge protection function with LED indicator that protects your devices from sudden spikes and power surges
Timer function that schedules the smart sockets to automatically power connected devices on and off as needed
Individual socket LED indicators
Separate manual power button to turn all switches on or off
Product diagram:
Installation
To take control of your Mercury power strip you first need to install the free TuyaSmart application from your relevant smartphone service provider (i.e Apple App Store, Google Play Store etc). Once this is installed you will need to follow the onscreen instructions to setup an account.
Plug in your Mercury power strip, enable Bluetooth on your smart device and with the TuyaSmart application running press the power button on the unit for around 5 seconds until the LED indicator blinks rapidly.
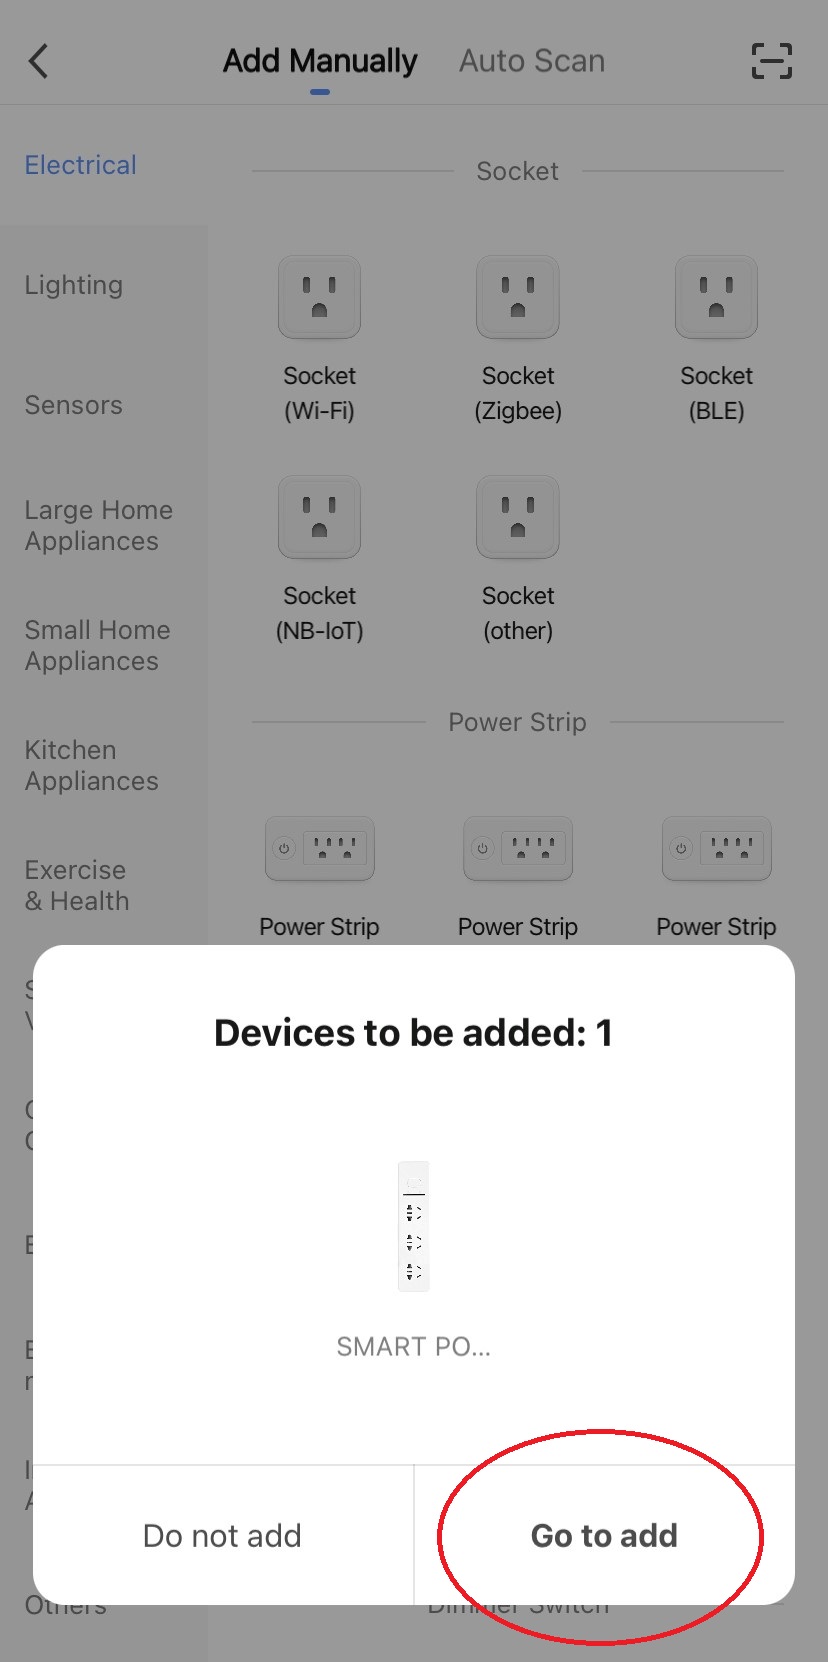
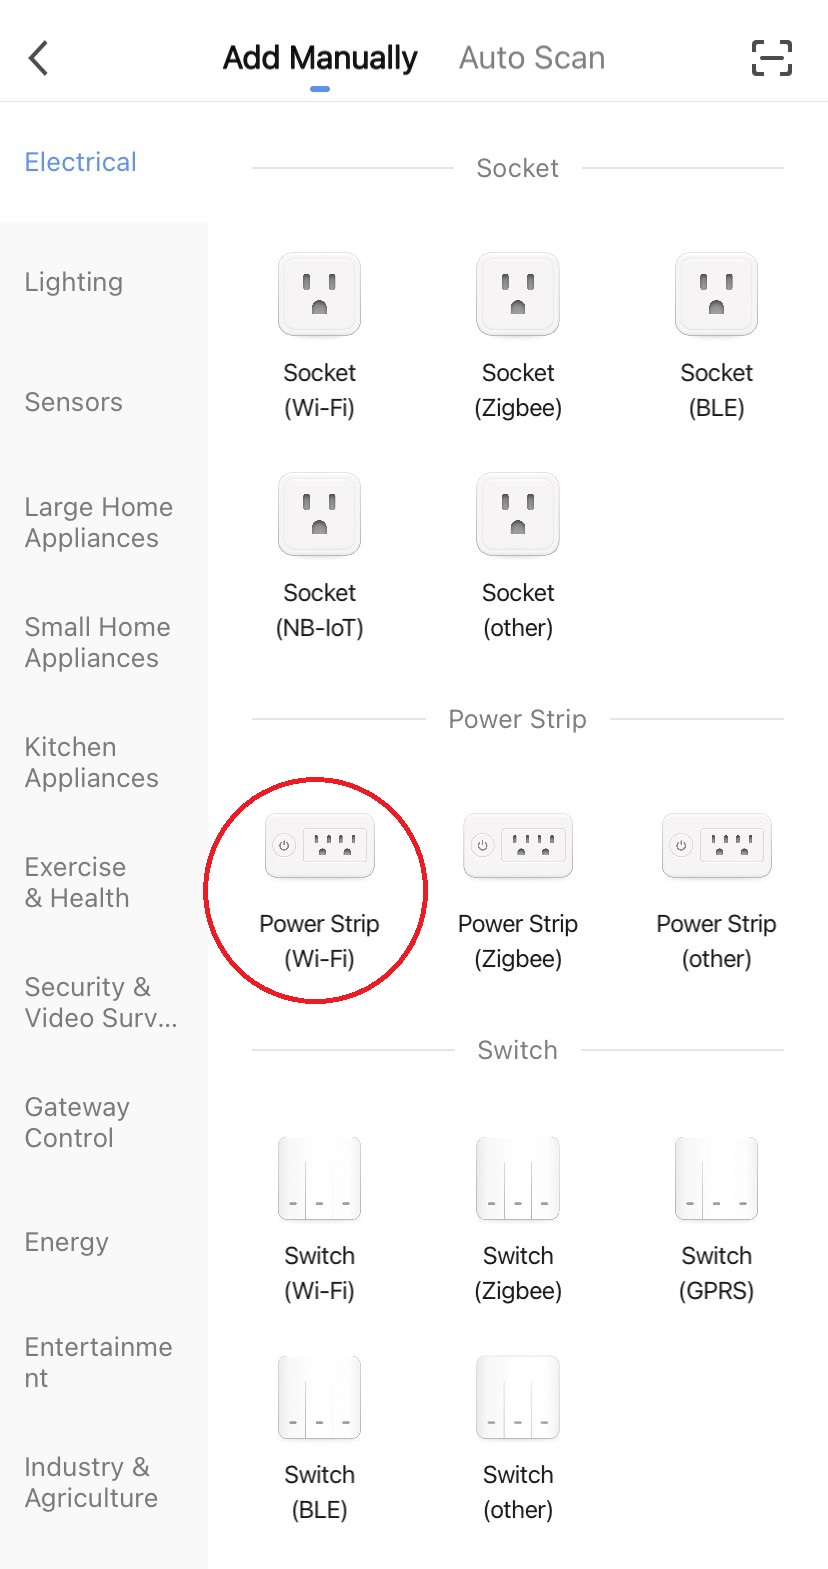
Sometimes the app will auto-detect the power strip, if this is the case select “Go to add” and proceed to point 4 (Fig.1). If you need to manually add the power strip, click on the blue cross in the top right-hand corner of the screen and select “Power Strip (Wi-Fi) from the menu (Fig.2)
Confirm the Wi-Fi your smart device is connected to and enter the password then click next. Note: this power strip is only compatible with 2.4Ghz signals and wont work on 5G networks.
Once the app has successfully loaded the settings for the power strip you can amend the name by clicking on the pencil next to the heading at the top. You can also allocate the device to a default room by selecting from the choices on the screen.
Once you have made your selections select done to complete the setup (Fig.3)

Controlling Using The Application
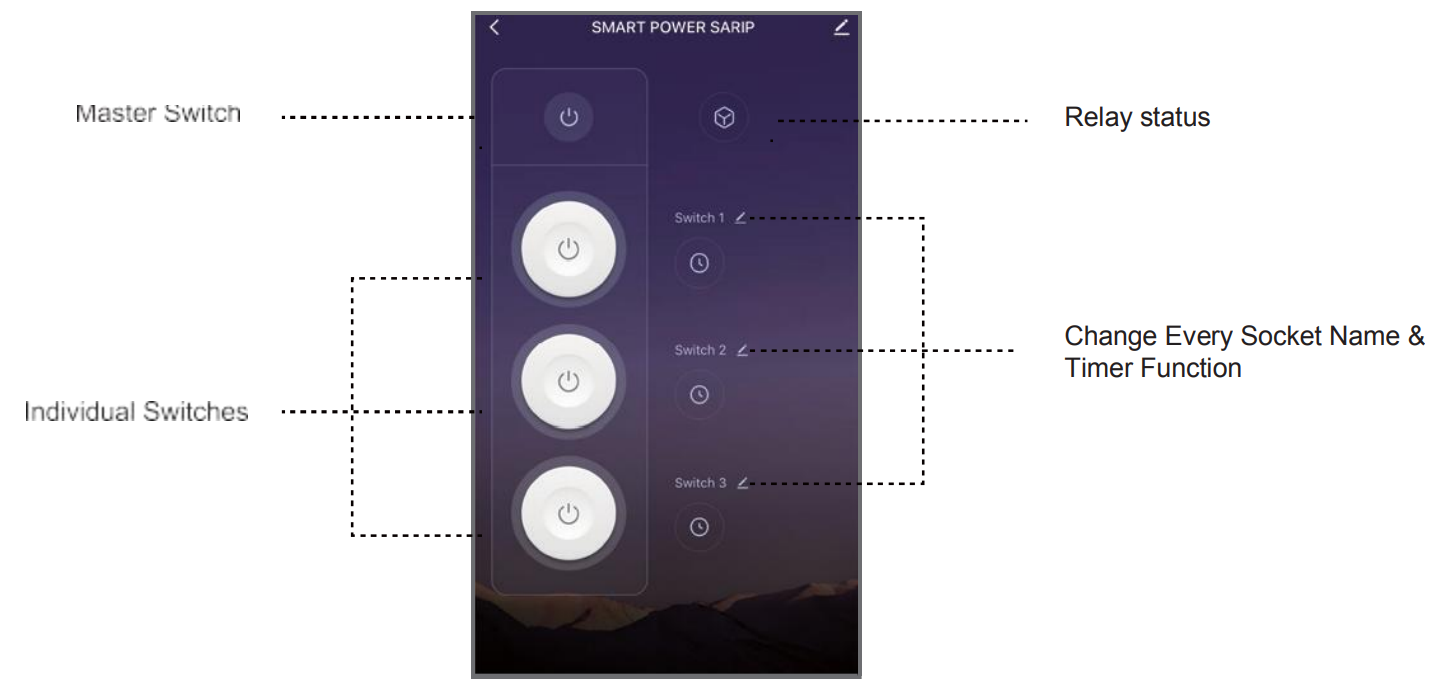
Once setup is complete you will enter the main control screen for the power strip. From here its possible to control all 3 sockets independently along with all 3 together (Fig.4).
Press on the large switches to control sockets 1-3 independently, after selection the switch surround on the screen will be illuminated, you will hear the switch click on and off and the blue LED on the unit will illuminate.
You may also press the smaller Master switch at the top to turn on and off all 3 sockets simultaneously.
On the right of each socket is a small pencil symbol which when selected enables the socket names to be amended.
The small clock symbol that sits underneath each socket name, enables entry to the timer functions for the switches. There are 4 different timer functions in this section namely Countdown, Schedule, Circulate and Random. Each one of these functions provides different options for each individual socket as indicated in the sections below.
There is also a Relay Status setting at the top which can be set to either on or off. This setting determines the status of the power strip after a loss of power or power surge causing shutdown. The default setting is off which means after any loss of power to the unit it will remain switched off even after power has been restored and will need resetting accordingly.
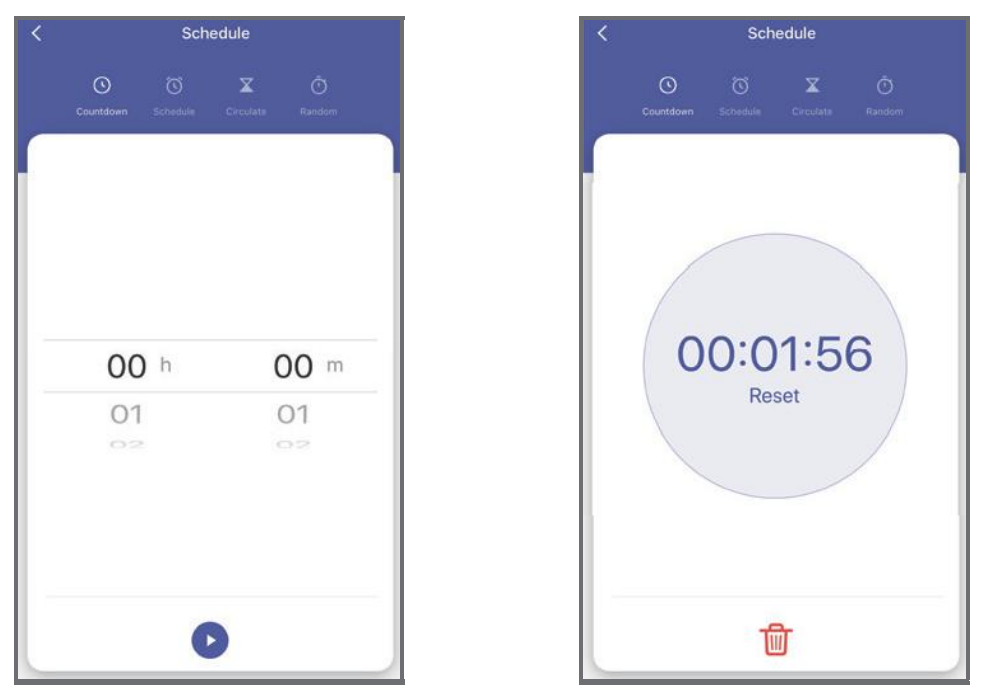 Countdown: The sockets can be set to turn
on or off after a scheduled length of countdown time. This time will
begin immediately after setting and enabling the function
(Fig.5).
Countdown: The sockets can be set to turn
on or off after a scheduled length of countdown time. This time will
begin immediately after setting and enabling the function
(Fig.5).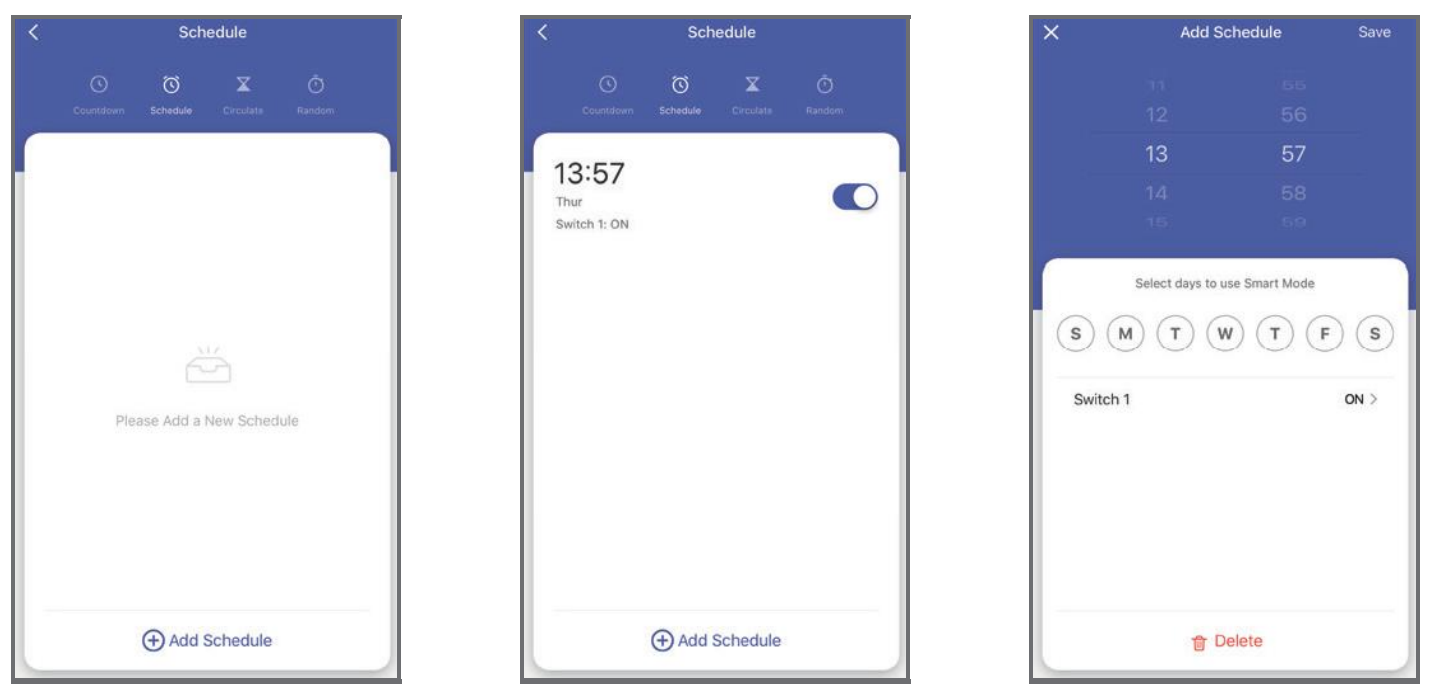 Schedule: The sockets can be set to turn
on or off on any individual day or block of days. These set times
can be switched on and off individually when needed using the slide
switch icon next to each time schedule (Fig.6).
Schedule: The sockets can be set to turn
on or off on any individual day or block of days. These set times
can be switched on and off individually when needed using the slide
switch icon next to each time schedule (Fig.6).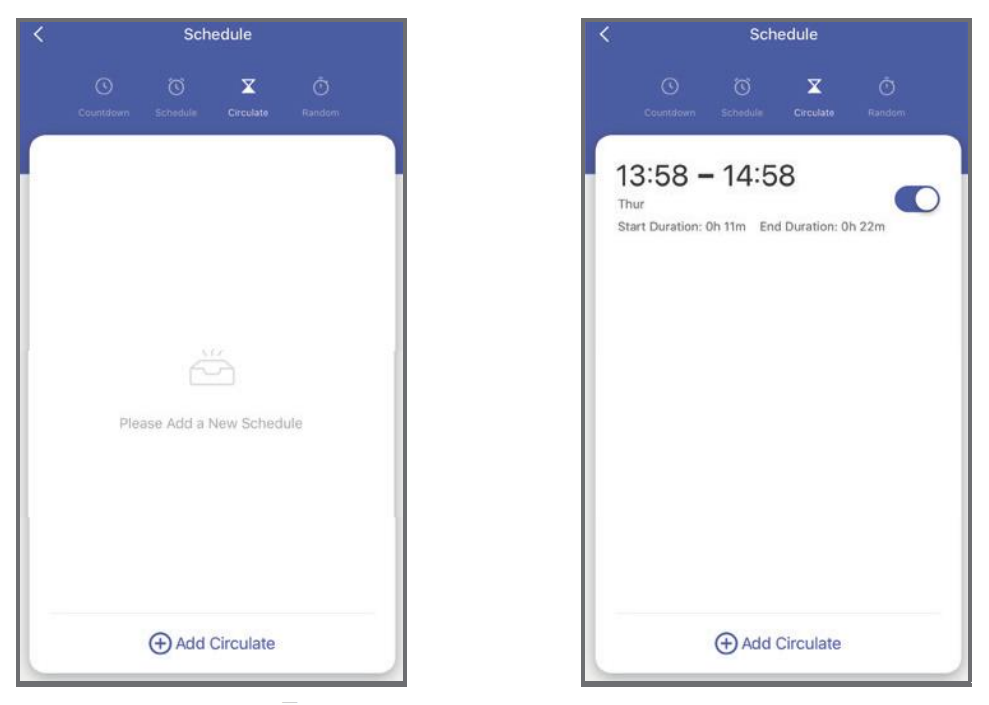 Circulate: The sockets can be set to
switch on and off repeatedly from start time to end time. In the
example below in Fig.7 the socket is set to switch on and off
after every 11 minutes from 13:58 to 14:58.
Circulate: The sockets can be set to
switch on and off repeatedly from start time to end time. In the
example below in Fig.7 the socket is set to switch on and off
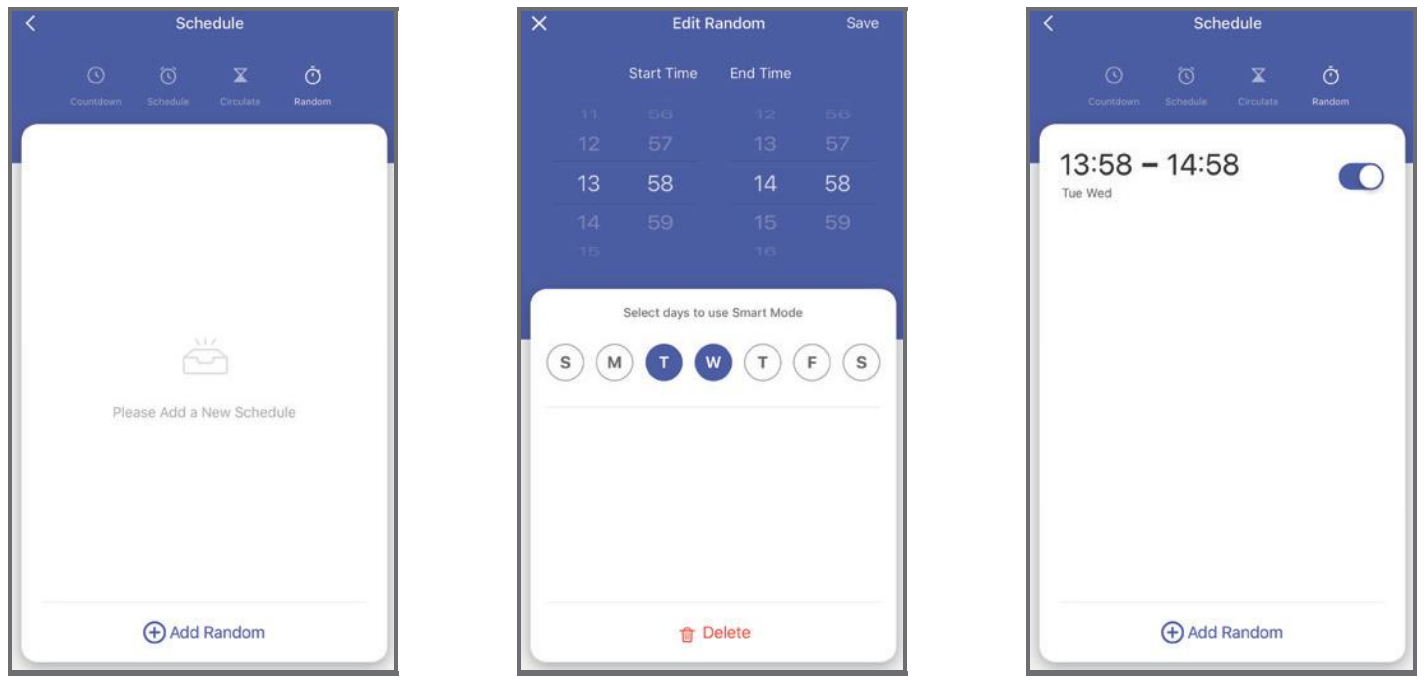
after every 11 minutes from 13:58 to 14:58.Random: The sockets can be set to switch on and off at a random time each day depending on the timeframe set. The app will split the timeframe in half and switch on at a random time in the first half minus 2 minutes and off again in the second half minus 2 minutes. In the example below in Fig.8 the socket will switch on at a random time every Tuesday and Wednesday between 13.58 and 14.26 (14.28 minus 2 minutes) and off again at a random time between 14.28 and 14.56 (14.58 minus 2 minutes).
Connection To Voice Control Applications
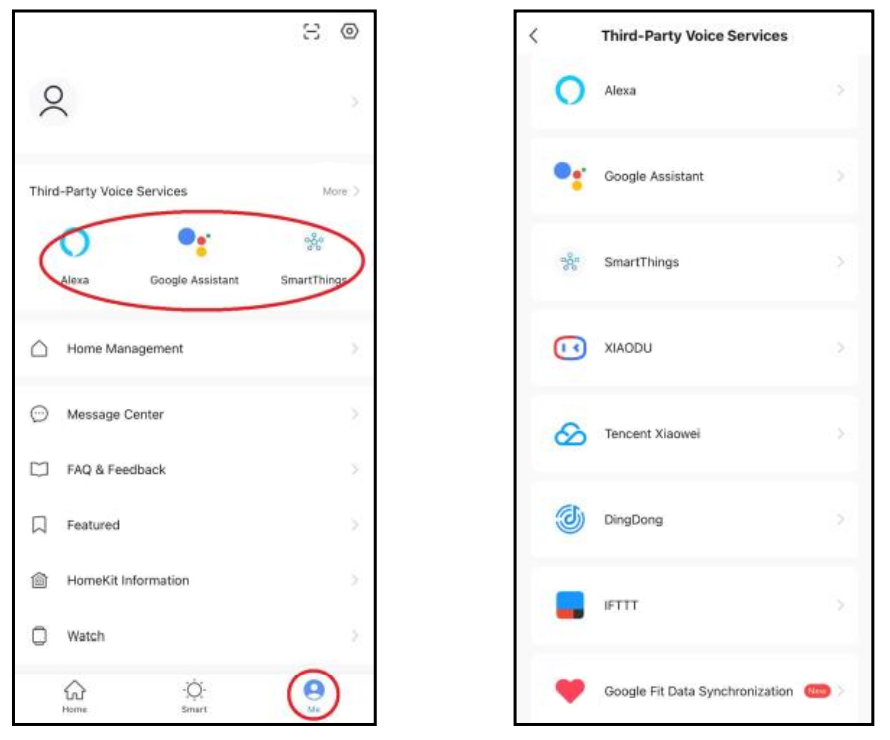
It is also possible to connect the power strip to certain voice control applications such as Amazon Alexa, Google Assistant and Samsung Smart Things.
Some applications will automatically detect the power strip once added to TuyaSmart and just ask for your authorization. If this is not the case, you need to go to the “Me” section of the application (Fig.9) and select either one of the main 3 apps at the top or “Third-party services – More” for the longer list of compatible applications (Fig.9).
To use with Amazon Alexa, tap “Skills” in the Alexa application on your smart device then look for TuyaSmart in the menu and tap “Enable”. Once connected you will be directed to the TuyaSmart account page where you need to enter your username, password and country of origin then tap “Link now” to link with your TuyaSmart account.
To use with Google Home open the application and tap “Add device” in the Home Control section. Select TuyaSmart from the list of available applications then enter your correct account details to complete the linking process. Once connected the Power strip will be visible in the Home Control device list of the Google Home application.
Troubleshooting
| Smart power strip won’t connect to TuyaSmart application | Ensure your smart device is connected to a 2.4Ghz network and Bluetooth is enabled Ensure the power strip is within range of your wireless network and in connection mode |
|---|---|
| Smart power strip has stopped working with my smart device | Perform a reset by pressing and holding the power button for 5 seconds until the LED indicator blinks rapidly then follow the installation instructions again on page 2 |
| I have set a timer schedule but it’s not working | Ensure you have added both an on and off time to your schedule and they are both switched on |
| When I use the timer function it isn’t switching off | Ensure you have added an off time to your schedule |
| Smart power strip will not connect to my voice assistant application | Ensure its compatible with TuyaSmart and listed in the Third-party Services menu |
| I have something plugged into one of the USB ports and its not switching on or off | The USB ports on the power strip are constantly live and can only be switched off by unplugging it at the mains |
Warning:
For reasons of electrical safety, this device must never be immersed in water, exposed to damp conditions or excessive force.
Do not use this device if you find that it is damaged in any way.
Do not attempt to repair this device or take apart under any circumstances, as this will invalidate your warranty.
Specification
| Specification | Value |
|---|---|
| Power supply | 230-240V~/50Hz |
| Max. load | 13A |
| USB output current | Single 5V 2.4A Max; Total 5V 4.5A Max |
| Connections | 3x UK Mains, 2x USB Type-A, 1x USB Type-C |
| Wireless connection | 2.4GHz |
| Cable : length | 1.5m |
| Dimensions | 290 x 60 x 30mm |
| Weight | 615g |
Precautions
| CAUTION | ||
| RISK OF ELECTRIC SHOCK DO NOT OPEN | ||
| CAUTION : TO REDUCE THE RISK OF ELECTRIC SHOCK, DO NOT REMOVE COVER (OR BACK) NO USER-SERVICEABLE PARTS INSIDE REFER SERVICING TO QUALIFIED SERVICE PERSONNEL | ||
This symbol indicates that dangerous voltage constituting a risk of electric shock is present within this unit
This symbol indicates that there are important operating and maintenance instructions in the literature accompanying this unit
Safety Notice
- Prior to use, read through this safety guide.
- Pay attention to safety warnings.
- Observe all operating requirements.
- For any items designed for indoor use only, do not operate near water or in humid environments.
- For cleaning, only use a lint-free, dry cloth.
- Install according to the specifications.
- Place away from heat sources or heating appliances.
- During placement, ensure adequate support for the product and access to controls and connectors.
- Do not obstruct any cooling vents or openings and allow adequate space for air flow.
- Use only power connections supplied with the product or suitable equivalents.
- Do not modify the equipment in any way.
- For any mains powered appliances, ensure that the mains voltage is as described in the specifications.
- Keep powered products and batteries away from the reach of children.
- In case of malfunction, water ingress or other damage, consult qualified service personnel.
- Avoid pressure or impact to the housing that may result in damage when transporting or installing this product.
- For any Earthed mains product, ensure that the power supply has a protective Earth connection.
- Keep all packaging materials out of reach of children.
Indoor use only : The "House" symbol identifes electrical equipment designed primarily for indoor use.
Disposal : The "Crossed Wheelie Bin" symbol on the product means that the product is classed as Electrical or Electronic equipment and should not be disposed with other household or commercial waste at the end of its useful life. The goods must be disposed of according to your local council guidelines.
AVSL Group Ltd, Unit 2 Bridgewater Park, Taylor Road, Manchester, M41 7JQ, Unitied Kingdom
AVSL (EUROPE) Ltd, Unit 3D North Point House, North Point Business Park, New Mallow Road, Cork, Ireland