PERFORMER-12
Performer Portable PA Speaker
178.902UK
Introduction
Thank you for choosing the PERFORMER-12 portable PA unit. Please read this manual prior to use to avoid damage to the item. This versatile portable PA unit is packed with features in a compact, manageable enclosure and is suitable for a wide array of applications ranging from public address for presentations to outdoor karaoke.
Package Contents
Please check the contents to ensure that the product has been received in good condition.
- PERFORMER-12 portable PA unit
- 2 x UHF handheld microphones
- IEC mains power lead(s)
- IR Remote control for media player
If you find any accessory is missing or the product has arrived with any problems, please contact your retailer at once.
This product contains no user-serviceable parts so make no attempt to try to fix or modify this item yourself as this will invalidate the warranty. We recommend you keep the original package and proof of purchase for any possible replacement or returned demand.
Warning
To prevent the risk of fire or electric shock, do not expose this appliance to rain or moisture. To prevent electric shock do not remove the cover. No user serviceable parts inside. Refer any service issues to qualified service personnel.
Safety
Prior to connecting mains, ensure that the supply voltage is correct and the mains lead is in good condition. Avoid ingress of water or particles into the enclosure. If the mains fuse blows, refer the unit to qualified service personnel. If the UHF microphones are to be unused for a long period of time, remove the batteries and store for later use.
Placement
Keep the unit out of direct sunlight and away from heat sources. Place the unit in an upright position during use and storage. Keep the unit away from moisture or dusty environments.
Cleaning
Use a soft cloth with neutral detergent to clean the cabinet, panel and controls. To avoid damage, do not use solvents to clean this equipment.
Rear Panel
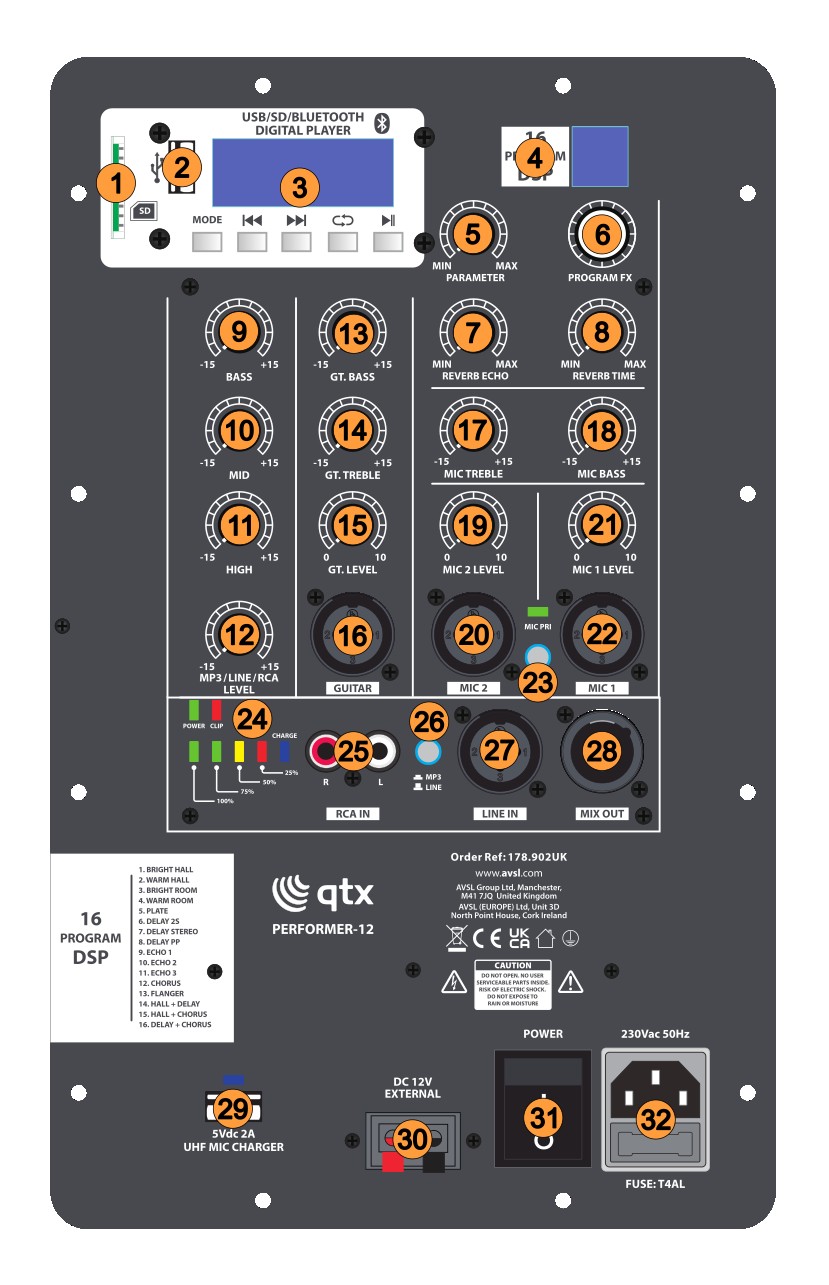
- SD card slot
- USB-A port
- Audio player and controls
- DSP effects display
- DSP effects PARAMETER control
- DSP effects PROGRAM dial
- REVERB ECHO control
- REVERB TIME control
- MP3/LINE input BASS control
- MP3/LINE input MID control
- MP3/LINE input HIGH control
- MP3/LINE input LEVEL control
- Guitar BASS control
- Guitar TREBLE control
- Guitar LEVEL control
- GUITAR input (XLR/jack)
- MIC TREBLE control
- MIC BASS control
- MIC 2 LEVEL control
- MIC 2 input (XLR/jack)
- MIC 1 LEVEL control
- MIC 1 input (XLR/jack)
- MIC priority switch
- POWER/CLIP/CHARGE indicators
- Line input RCA connectors
- MP3/LINE selector switch
- LINE IN input (XLR/jack)
- MIX OUT line output (XLR/jack)
- USB MIC CHARGER 5V power output
- External 12Vdc power input terminals
- POWER switch
- IEC mains power inlet and fuse holder
Connection
Your new QTX PERFORMER-12 portable PA unit may arrive with you with the internal battery charged. Before connecting to the mains, switch the unit on and check the POWER LED. If it is green, there is charge in the battery. If it is red, then you will need to charge the battery before using away from a mains supply (see “Charging the battery” below)
Connect the PERFORMER-12 portable PA unit to the mains (32) using the appropriate mains IEC lead supplied. You can otherwise opt to connect the DC input (30) at the rear to an external 12Vdc supply, such as a car battery, or use the internal battery if charged.
Power Up
Turn the MP3/LINE/RCA LEVEL, GT. LEVEL, MIC2 LEVEL and MIC1 LEVEL,controls (12, 15, 19, 21) down (anti-clockwise) and press the POWER switch (31) on. The power LED (24) should light (if not, check the power supply, connections and if necessary disconnet and check the fuse)
All BASS, MID, HIGH or TREBLE controls (9, 10, 11, 13, 14, 17, 18) should remain pointing vertically (12-o-clock position).
Ensure that the MIC PRI switch (23) is not pressed in.
Your PERFORMER-12 PA unit should now be ready to operate.
UHF Wireless Microphones
Directly on top of the PERFORMER-12 PA unit is a push-to-open flap for the integral microphone compartment. Press down and release this flap to open it, revealing the 2 handheld microphone transmitters inside. Remove both transmitters for checking and close the flap and press to latch it closed. Each handheld microphone transmitter is rechargeable from USB. There is a split lead supplied for this with a single USB-A plug, which connects to a USB charger or the USB charge port (29) on the rear panel of the PERFORMER-12 PA to two USB-C plugs, which connect to the bottom of each handheld microphone transmitter.
Unscrewing the lower part of the microphone transmitter body reveals the 18650 Li-ion battery and 3 control buttons which can be used for settings when the microphone is powered up. The lower 2 control buttons are +/- for the microphone's output volume setting. The top button is for setting the UHF carrier frequency for the transmitter and its corresponding receiver inside the PERFORMER-12 PA unit. This gives the user an optional set of carrier frequencies to use for each handheld microphone to help with avoiding interference from other UHF equipment that might be operating nearby.
Screw the lower battery compartment cover back onto the transmitter and press the front (grey or orange) button for 3 seconds. The LCD display will light up and show the UHF carrier frequency (in MHz), battery status, and signal strength of the transmitter. To check the wireless UHF microphones, increase the MIC 1 LEVEL or MIC 2 LEVEL controls (21, 19) whilst speaking into the respective microphone and then increase the level setting until the required volume is reached. There are MIC TREBLE and BASS controls (17, 18) which will boost or cut the high or low frequencies respectively. Use these to tailor the microphone tone (or EQ) to suit the user and environment. TREBLE can help with making speech and detail more audible but can also make the microphone more prone to feedback (squealing that happens when the microphone can "hear" its speaker). Likewise, BASS can help to add warmth and power to the voice but too much can also lead to howling or increased handling noise. Experimentation is the key to the perfect balance.
The 2 microphones can be given priority over the other inputs to the PERFORMER-12 by pressing in the MIC PRI switch (23), which will suppress the output of guitar, line input, or music channels when the microphone is spoken into. This can be useful for announcements or instructions.
The 2 microphone channels can also be used for wired microphones, if preferred, which can be connected via the combo XLR/jack inputs beneath each level control (20, 22). When connected here, the UHF microphone input is not muted, so the input is shared with the relevant wireless mic.
When not being used, press and hold the front button to power down the microphone transmitter and store inside the mic compartment for safety.
DSP Effects
In addition for the microphones, there is a DSP effects section (4) to add echo or reverb type effects for vocals. To add an effect to the microphones, turn up the REVERB TIME control (8) to the desired amount of effect and adjust the effect using the REVERB ECHO control (7). There are 16 effect presets available, selected by rotating the PROGRAM FX dial and pressing it in on the required number. These effect types are described in a list printed near the bottom left side of the rear panel. For each preset, there is a further adjustment possible using the PARAMETER control (5), which alters the character of the chosen preset by adjusting a depth or tonal parameter. Again, experimentation is the key to get the ideal vocal effect.
Guitar Input
The PERFORMER-12 has an additional combo XLR/Jack input for GUITAR (16), which can accept an input from an electric or acoustic guitar or other similar electric instrument. This input has a separate LEVEL control (15) and independent BASS and TREBLE controls (13, 14) for tone shaping. The BASS & TREBLE controls are neutral in the vertical (12 o'clock) position with cut to the left and boost to the right.
Line Input
There is a line input accessible via LINE IN XLR/Jack connection (27) or twin RCA socket (25). Connecting a line level signal (e.g mp3 player, DAB radio, laptop, electronic keyboard etc.) to this input will add it to the mix of microphone and guitar inputs. For this input, ensure that the MP3/LINE selector switch (26) is in the "out" position. There is a dedicated LEVEL control (12) and separate 3-band EQ, with BASS, MID, HIGH controls (9, 10, 11) for tone adjustment. As with other tone controls, the BASS, MID, HIGH controls are neutral in the vertical position with cut to the left and boost to the right of this. For safety, begin checking the signal with the MP3/LINE/RCA LEVEL control turned down and gradually increase to the required amount.
Internal Audio Player
To operate the internal audio player, ensuring the MP3/LINE/RCA LEVEL control is turned down, press in the MP3/LINE selector button. Insert a USB pen drive (2) or SD card (1) with mp3 or wma tracks stored on it will automatically begin playback. As with the line input, this player is governed by the MP3/LINE/RCA LEVEL and BASS, MID, HIGH controls.
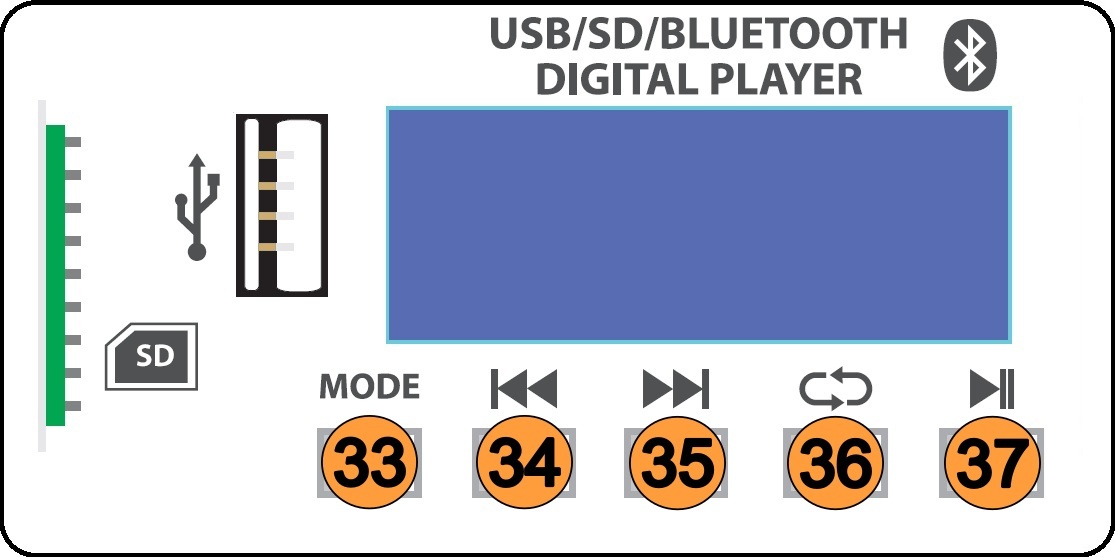
- Selects between USB, SD, or Bluetooth modes
- Previous track select
- Next track select
- Repeat mode - ONE (repeat current track), RdO (random play), ALL (repeat all tracks)
- Play / Pause current track
Bluetooth Receiver
The PERFORMER-12 audio player section has a mode for Bluetooth (shown as "bLUE" in the display). This mode allows audio to be wirelessly streamed to the player section from a smart phone or other host device. When enabled, open the menu on the smart phone or other host device and search for "PERFORMER-12" and choose to pair. Once pairing is successful, audio playback from the host device will appear in the audio player in the same way as playback from a USB or SD card. Play / Pause, Previous and Next track controls will also remotely control playback of tracks from the sending device.
Line Output
In addition to the input connections, the PERFORMER-12 has a MIX OUT connection via XLR (28). This can be connected onto further equipment, such as active speakers to expand the sound system or even used for recording. The signal is the same mix of the microphone, guitar, line input or audio player that is produced through the PERFORMER-12 speaker itself.
It is important to turn down the volume controls and power down the PERFORMER-12 unit when not in use. Do not let the charge run too low or store the battery uncharged, as this could reduce the capacity of the internal battery. Do not store in very cold conditions as this can also affect the internal battery.
Precautions
Indoor use only : The "House" symbol identifes electrical equipment designed primarily for indoor use.
Disposal : The "Crossed Wheelie Bin" symbol on the product means that the product is classed as Electrical or Electronic equipment and should not be disposed with other household or commercial waste at the end of its useful life. The goods must be disposed of according to your local council guidelines.
AVSL Group Ltd, Unit 2 Bridgewater Park, Taylor Road, Manchester, M41 7JQ, Unitied Kingdom
AVSL (EUROPE) Ltd, Unit 3D North Point House, North Point Business Park, New Mallow Road, Cork, Ireland

