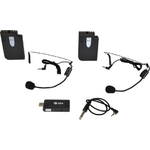
U-MIC-863.2+864.8-N
U-MIC USB Dual Neckband UHF Wireless System
171.812UK
Introduction
Thank you for choosing the U-MIC for your wireless microphone requirements. This system is designed to provide a reliable, cable-free solution with minimal setup and ease of use. Please read and keep this user manual to get the best results from your product and avoid damage through misuse.

Layout

| No | Description |
|---|---|
| 1. | Volume control |
| 2. | 3.5mm mic input |
| 3. | LED power indicator |
| 4. | Power switch |
| 5. | Battery compartment |
| 6. | USB type A plug |
| 7. | 3.5mm audio output |
| 8. | USB type A socket |
Setting Up
The U-MIC is supplied as 2 individual beltpack microphone transmitters and a USB receiver with a 3.5mm to 6.3mm jack lead.
The USB type A plug (6) on the receiver should be connected to a USB port for power (5V, 1000mA). This can be from a USB power adaptor or power bank for portable use if required. The connection can also be made to the receiver using an optional USB extension lead if preferred.
Note: the audio is not transmitted to the USB port. The USB is for power only.
If the USB port is a U-Disk player or computer port, the digital media (USB stick) or other peripheral device can still be connected through the receiver by connecting to the USB type A socket (8) on the rear of the receiver.
Operation
The U-MIC receiver is designed to connect to a microphone input jack on a mixer or amplifier. Turn down the volume level on the microphone input of the mixer or amplifier before connecting to avoid loud noises when connecting.
Connect the 3.5mm plug of the supplied lead into the USB receiver (7) and connect the 6.3mm plug to the appropriate microphone input jack on the mixer or amplifier.
Note: The output of both of the beltpack transmitters is mixed to the same single 3.5mm output.
Each beltpack transmitter has an on/off switch (4), which should be in the up position (off). The top volume control (1) should be turned fully down. Connect the neckband microphone to the 3.5mm microphone input (2).
Slide open the cover of the battery compartment (5) and insert 2 x AA alkaline batteries per transmitter, ensuring that the polarity is the correct way around.
Move the switch down to the “on” position and the power indicator (3) should light. Note that the switch has a centre position which is also “on”.
Gradually turn up the volume control on top of each beltpack transmitter and the level on the mixer or amplifier and speak into the neckband microphones in turn until the sound can be heard through the connected speakers or recording equipment. Increase the volume to the required level.
If the microphones are not being used, turn down the volume level on the top of each beltpack transmitter and the mixer/amplifier and switch the power off.
For long term storage, unplug the jack and USB receiver and remove the batteries from both beltpack transmitters.
Specification
| Specification | Value |
|---|---|
| Power supply | USB 5V, 1A (receiver), 2 x AA batteries (each transmitter) |
| Carrier frequencies | 863.2MHz + 864.8MHz |
| Frequency response | 50Hz - 15kHz |
| Output connection | 3.5mm mono jack |
| Wireless range | Up to 50m |
| Dimensions : neckband microphone | 150 x 120 x 120mm (each) |
| Weight : neckband microphone | 21g (each) |
| Dimensions : transmitter | 105 x 65 x 30mm (each) |
| Weight : transmitter | 67g (each - no battery) |
| Dimensions : receiver | 80 x 34 x 15mm |
| Weight : receiver | 25g |
Precautions
| CAUTION | ||
| RISK OF ELECTRIC SHOCK DO NOT OPEN | ||
| CAUTION : TO REDUCE THE RISK OF ELECTRIC SHOCK, DO NOT REMOVE COVER (OR BACK) NO USER-SERVICEABLE PARTS INSIDE REFER SERVICING TO QUALIFIED SERVICE PERSONNEL | ||
This symbol indicates that dangerous voltage constituting a risk of electric shock is present within this unit
This symbol indicates that there are important operating and maintenance instructions in the literature accompanying this unit
Safety Notice
- Prior to use, read through this safety guide.
- Pay attention to safety warnings.
- Observe all operating requirements.
- For any items designed for indoor use only, do not operate near water or in humid environments.
- For cleaning, only use a lint-free, dry cloth.
- Install according to the specifications.
- Place away from heat sources or heating appliances.
- During placement, ensure adequate support for the product and access to controls and connectors.
- Do not obstruct any cooling vents or openings and allow adequate space for air flow.
- Use only power connections supplied with the product or suitable equivalents.
- Do not modify the equipment in any way.
- For any mains powered appliances, ensure that the mains voltage is as described in the specifications.
- Keep powered products and batteries away from the reach of children.
- In case of malfunction, water ingress or other damage, consult qualified service personnel.
- Avoid pressure or impact to the housing that may result in damage when transporting or installing this product.
- For any Earthed mains product, ensure that the power supply has a protective Earth connection.
- Keep all packaging materials out of reach of children.
Disposal : The "Crossed Wheelie Bin" symbol on the product means that the product is classed as Electrical or Electronic equipment and should not be disposed with other household or commercial waste at the end of its useful life. The goods must be disposed of according to your local council guidelines.
AVSL (EUROPE) Ltd, Unit 3D North Point House, North Point Business Park, New Mallow Road, Cork, Ireland

