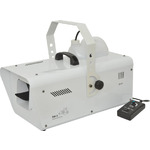
SW-2
SW-2: Snow Machine 1200W
160.565UK
Introduction
Thank you for choosing the SW-2 DMX snow machine for stage and events special effects. This product is designed to produce high volume snow output on demand for festive and themed events. Please read these instructions in full to gain the best results from this item and avoid damage to the unit through misuse.
Caution: Please read this manual carefully before operating Damage caused by misuse is not covered by the warranty
Unpacking
Your SW-2 should reach you in good condition and should be supplied with
IEC mains lead(s) and a wired remote control.
If there are any signs of damage or items missing from the packaging,
contact your dealer immediately.
Warning
To prevent risk of fire or electric shock, do not expose electrical parts to rain or moisture.
If liquids are spilled on areas other than the fluid tank or nozzle, disconnect the mains, allow the SW-2 to dry out and have it checked by qualified personnel before further use.
Avoid any impact, dropping or extreme pressure to the housing.
No user serviceable parts inside - do not open the case.
Allow the SW-2 to acclimatize to room temperature before operating.
Refer all servicing to qualified service personnel.
Placement
The SW-2 has a built-in snow fluid container and should be operated in
an upright position.
If free-standing, ensure that the SW-2 is positioned on a stable,
non-slip surface.
If mounted at height, use the integral mounting bracket and attach a
safety cable for added security.
Safety
- Check for correct mains voltage and condition of IEC lead before connecting to power outlet.
- Check the condition of the remote lead and ensure that it is not trapped.
- This unit must be earthed.
- This unit produces a snow effect using foam, which may cause a slip hazard on some floor surfaces.
Cleaning
- Use a soft dry or slightly damp to clean the casing.
- Do not use strong solvents for cleaning the unit.
- Clean the foam mechanism periodically by operating with distilled water instead of snow fluid.
Rear Panel
| No | Description |
|---|---|
| 1. | DIP switches for DMX address setting |
| 2. | DMX input (3-pin XLRM) |
| 3. | DMX output (3-pin XLRF) |
| 4. | Power on/off rocker switch |
| 5. | Mains inlet (IEC male) and fuse holder |
| 6. | Remote control connection (5-pin DIN) |
| 7. | Fluid level indicator |

Setting Up
The SW-2 requires snow fluid, which forms small foam drops to create the
snow effect.
It is recommended to use qtx snow fluid for best results (160.578,
160.579)
A chart for recommended fluids is included further along in this document.
- Unscrew the top cap of the fluid tank (removable) and fill with the selected snow fluid.
- The SW-2 can accommodate a complete 5 litre snow fluid refill if preferred.
- Replace the cap and close securely, ensuring the pipe is fed down to the bottom of the bottle so that a consistent flow of fluid is supplied to the machine.
- Connect the remote control to the 5-pin DIN connector on the rear panel (6).
- Connect the IEC mains lead supplied to the rear mains inlet (5).
Remote Control Operation
| No | Description |
|---|---|
| 8. | Snow output control – adjusts the amount of fluid delivered by the pump |
| 9. | Snow effect indicator – illuminates when effect is activated |
| 10. | Power indicator – illuminates when mains power is switched on |
| 11. | Snow effect on/off rocker switch – switches the fan on or off |
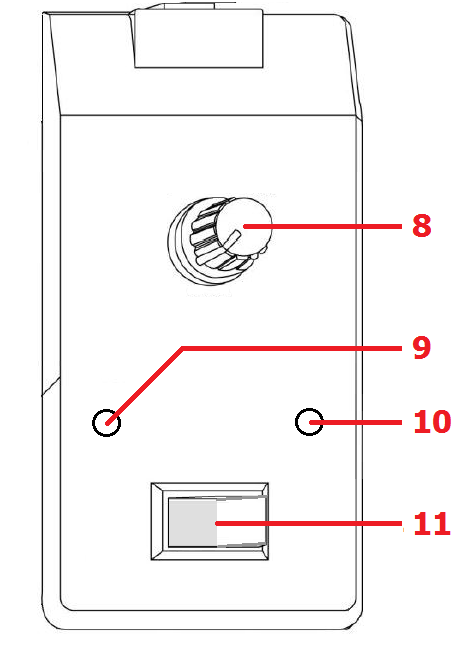
- Make sure that the remote control rocker switch (11) is set to the “off” position at startup.
- Switch the mains power on (4) at the rear of the unit And the power indicator (10) will light.
- Set the output control (8) to the lowest setting and switch the rocker switch on.
- The snow effect indicator (9) will light to show that the fan is active.
- Adjust the output control to the required density of snow pumped into the nozzle when active.
- Switch the rocker switch off to stop the fan and thus stop the effect.
DMX Operation
For DMX operation, a single channel controls both the fan and snow output pump.
- Connect DMX input from a controller or prior device to the XLRM connector (2) on the rear panel.
Connect further DMX devices from the XLRM connector (3) on the rear panel.
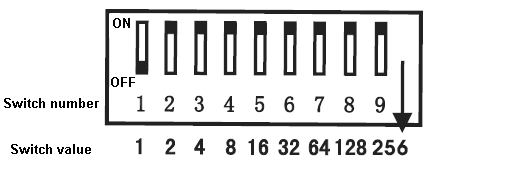
Set the DMX address (single channel) using the DIP switches (1) in binary format as shown below.
| DMX Address | DIP Switches | ||||||||
| 1 | 2 | 4 | 8 | 16 | 32 | 64 | 128 | 256 | |
| 1 | 1 | 0 | 0 | 0 | 0 | 0 | 0 | 0 | 0 |
| 2 | 0 | 1 | 0 | 0 | 0 | 0 | 0 | 0 | 0 |
| 3 | 1 | 1 | 0 | 0 | 0 | 0 | 0 | 0 | 0 |
| … | .. | .. | .. | .. | .. | .. | .. | .. | .. |
| 410 | 0 | 1 | 0 | 1 | 1 | 0 | 0 | 1 | 1 |
DMX control values operate the snow machine as follows.
| Value | Fan | Fluid pump |
|---|---|---|
| 0 - 5 | Fan off | and no snow output |
| 6 - 255 | Fan on | and snow output |
When in use for long periods, periodically check the fluid level indicator and refill if necessary.
Check that the foam produced does not cause a slip hazard on the floor surface and clean if necessary.
Switch of mains power when not in use. Disconnect from mains before moving or storage.
Troubleshooting
| Issue | Solution |
|---|---|
| No light on mains switch | Check mains voltage is correct and socket is switched on |
| Check IEC lead is OK and connected properly | |
| Check mains fuse in IEC connector and fuse in plug top | |
| If fuse blowing repeatedly, refer to qualified service personnel | |
| No power light on remote | Check remote control is connected properly |
| No snow output when using remote control | Check snow fluid level |
| Check that rocker switch is on and output control is turned up | |
| Check that nozzle cloth is not blocked and clean with water if necessary | |
| No snow output when using DMX control | Check that DMX lead is connected properly and correct start address is set |
| Ensure that a value between 6 and 255 is being transmitted on the channel |

Specification
| Specification | Value |
|---|---|
| Power supply | 220-240Vac, 50/60Hz (IEC) |
| Fluid capacity | 5 litre |
| Power | 1200W |
| Volume per minute | 50m³ |
| Remote control | Wired remote (on/off & output volume) |
| DMX channels | 1 channel (fan on/off & output 1 - 100%) |
| Dimensions | 320 x 300 x 525mm |
| Weight | 7.6kg |
Precautions
| CAUTION | ||
| RISK OF ELECTRIC SHOCK DO NOT OPEN | ||
| CAUTION : TO REDUCE THE RISK OF ELECTRIC SHOCK, DO NOT REMOVE COVER (OR BACK) NO USER-SERVICEABLE PARTS INSIDE REFER SERVICING TO QUALIFIED SERVICE PERSONNEL | ||
This symbol indicates that dangerous voltage constituting a risk of electric shock is present within this unit
This symbol indicates that there are important operating and maintenance instructions in the literature accompanying this unit
Safety Notice
- Prior to use, read through this safety guide.
- Pay attention to safety warnings.
- Observe all operating requirements.
- For any items designed for indoor use only, do not operate near water or in humid environments.
- For cleaning, only use a lint-free, dry cloth.
- Install according to the specifications.
- Place away from heat sources or heating appliances.
- During placement, ensure adequate support for the product and access to controls and connectors.
- Do not obstruct any cooling vents or openings and allow adequate space for air flow.
- Use only power connections supplied with the product or suitable equivalents.
- Do not modify the equipment in any way.
- For any mains powered appliances, ensure that the mains voltage is as described in the specifications.
- Keep powered products and batteries away from the reach of children.
- In case of malfunction, water ingress or other damage, consult qualified service personnel.
- Avoid pressure or impact to the housing that may result in damage when transporting or installing this product.
- For any Earthed mains product, ensure that the power supply has a protective Earth connection.
- Keep all packaging materials out of reach of children.
Indoor use only : The "House" symbol identifes electrical equipment designed primarily for indoor use.
Disposal : The "Crossed Wheelie Bin" symbol on the product means that the product is classed as Electrical or Electronic equipment and should not be disposed with other household or commercial waste at the end of its useful life. The goods must be disposed of according to your local council guidelines.
AVSL Group Ltd, Unit 2 Bridgewater Park, Taylor Road, Manchester, M41 7JQ, Unitied Kingdom
AVSL (EUROPE) Ltd, Unit 3D North Point House, North Point Business Park, New Mallow Road, Cork, Ireland