QTFX-B4
QTFX-B4: Professional Bubble Machine
160.564UK
Introduction
Thank you for choosing the QTFX-B4 professional bubble machine as part of your stage effects setup. This machine is the highest output model in the range and will provide consistent large area coverage. Please read and keep this manual to ensure maximum performance and avoid damage through misuse.

Unpacking
Your QTFX-B4 should reach you in good condition and should be supplied with IEC mains lead(s) and a wired handheld remote control. If there are any signs of damage or items missing from the packaging, contact your dealer immediately.
Warning
To prevent risk of fire or electric shock, do not expose electrical parts to rain or moisture.
If liquids are spilled on the housing or through the vents, disconnect the mains, allow the QTFX-B4 to dry out and have it checked by qualified personnel before further use.
Avoid any impact, dropping or extreme pressure to the housing.
No user serviceable parts inside - do not open the case.
Refer all servicing to qualified service personnel.
Placement
The QTFX-B4 has an open front fluid tank and should be operated in an upright position.
Choose a position where the bubble output is facing the area to be filled.
Ensure easy access to the rear panel and to the bubble fluid tank for
refilling and cleaning.
When moving the unit around, take care not to spill the contents of the
tank inside the machine.
Safety
- Check for correct mains voltage and condition of IEC lead before connecting to power outlet.
- Check the condition of the remote lead and ensure that it is not trapped.
- This unit must be earthed.
Cleaning
- Use a soft dry or slightly damp cloth to clean the casing.
- Do not use strong solvents for cleaning the unit.
- Empty contents and rinse the bubble fluid tanks after each use.
Setting Up
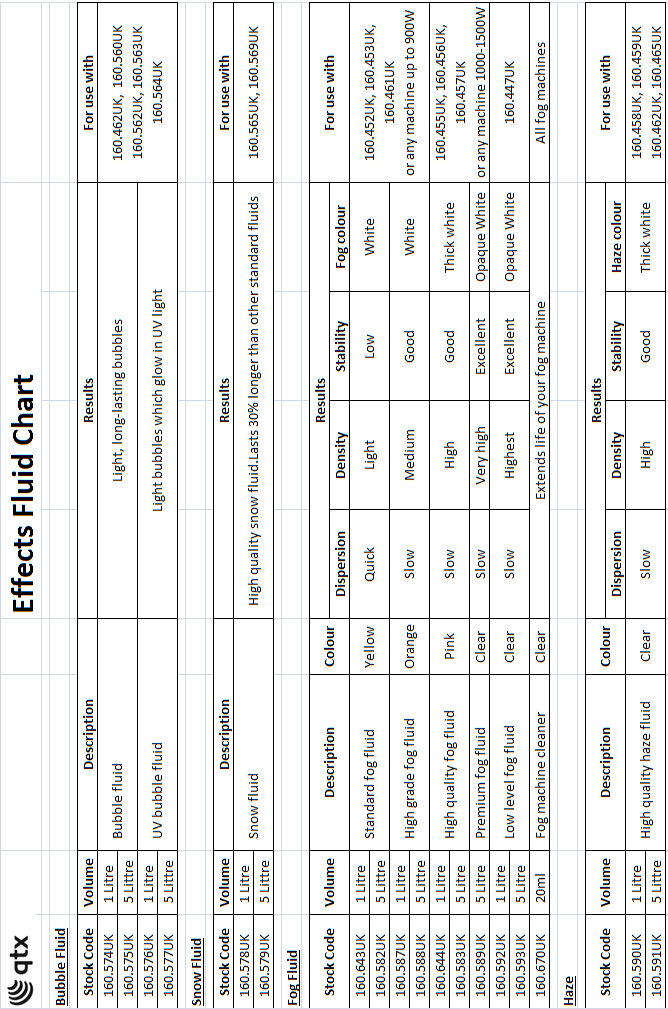
The QTFX-B4 requires bubble fluid to produce the effect.
It is recommended to use qtx bubble fluid for best results (160.574UK,
160.575UK)
For bubbles that glow in UV light, qtx UV bubble fluid may be used
(160.576UK, 160.577UK)
A chart for recommended fluids is included further along in this
document
- Pour bubble fluid directly into the front open tank, taking care not to spill on fans beneath the tank.
- Connect the supplied remote control to the female IEC on the rear panel.
- Connect the IEC mains plug.
Layout
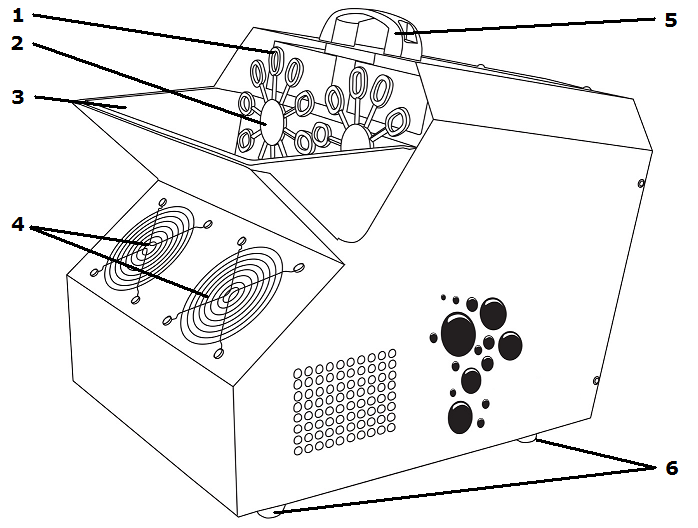
- Bubble wand
- Bubble wheel
- Tank (pour fluid in here)
- Front fans (do not cover)
- Carry handle
- Castor wheels
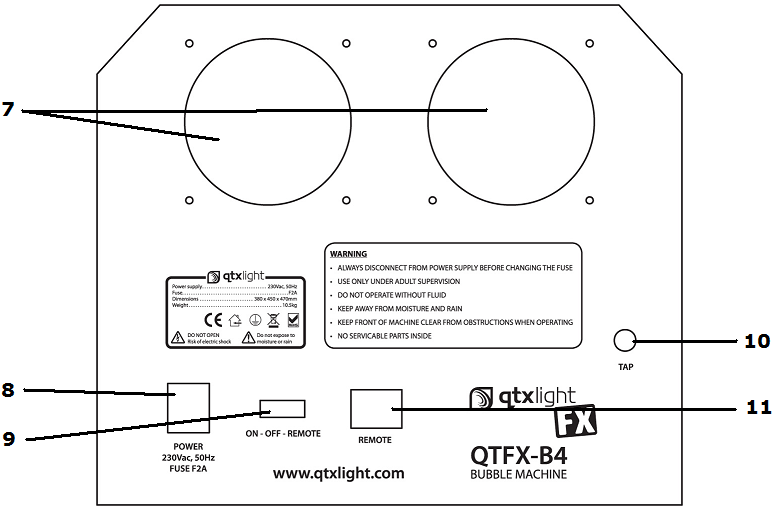
Rear Panel
- Rear Fans
- IEC Power Socket
- ON/OFF/REMOTE Switch
- Fluid drain tap
- Remote Socket
Operation
The QTFX-B4 is operated by a 3-position rocker switch. The centre
position is off.
Press this switch to the left for constant bubble output.
Press this switch to the right for remote control of the bubble
effect.
In this mode, bubbles are only produced when the switch on the remote
control is pressed.
After use, switch off the machine and disconnect from the mains.
Drain the remaining fluid via the drain tap at the rear of the unit.
Rinse the bubble fluid tank with clean water and drain this also, then close the tap.
Remote Control
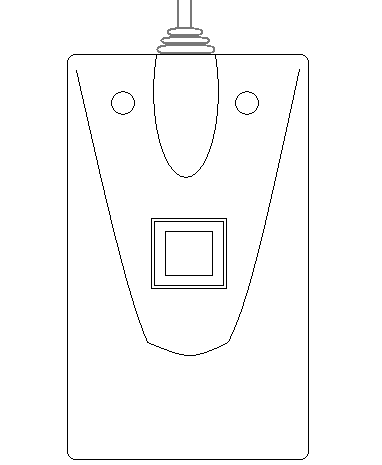
When the remote control is connected and the rear rocker switch is pressed to the REMOTE setting, pressing the button on the remote produces bubble output on demand.
Replacing The Fuse
Disconnect from the main power supply first, then remove the fuse holder part of the IEC Socket to reveal the fuse. Replace the correct fuse rating as stated on the fixture safety label or in the user guide. Lock the fuse holder cover back into place.
General Maintenance
To maintain optimum performance and minimize wear, the item should be cleaned frequently. Usage and environment are contributing factors in determining frequency. As a general rule, fixtures should be cleaned after each use to avoid dust build-up and blockages, which can result in poor performances, overheating and breakages. Be sure to power off fixture before conducting maintenance.
Unplug fixture from power. Use a vacuum or air compressor and a soft brush to remove dust collected on external vents and internal components. Clean the external case when the fixture is cold with a dry cloth or tissue and drag dirt and grime to the outside case.
To ensure a continuing high performance it is recommended to use warm water to clean the internal tank.
Specification
| Specification | Value |
|---|---|
| Power supply | 230Vac, 50Hz (IEC) |
| Power consumption | 100W |
| Number of wheels | 2 |
| Number of wands per wheel | 10 |
| RPM (per wheel) | 60 |
| Fluid capacity | 2.5 litres |
| Dimensions | 380 x 450 x 470mm |
| Weight | 10.5kg |
Precautions
| CAUTION | ||
| RISK OF ELECTRIC SHOCK DO NOT OPEN | ||
| CAUTION : TO REDUCE THE RISK OF ELECTRIC SHOCK, DO NOT REMOVE COVER (OR BACK) NO USER-SERVICEABLE PARTS INSIDE REFER SERVICING TO QUALIFIED SERVICE PERSONNEL | ||
This symbol indicates that dangerous voltage constituting a risk of electric shock is present within this unit
This symbol indicates that there are important operating and maintenance instructions in the literature accompanying this unit
Safety Notice
- Prior to use, read through this safety guide.
- Pay attention to safety warnings.
- Observe all operating requirements.
- For any items designed for indoor use only, do not operate near water or in humid environments.
- For cleaning, only use a lint-free, dry cloth.
- Install according to the specifications.
- Place away from heat sources or heating appliances.
- During placement, ensure adequate support for the product and access to controls and connectors.
- Do not obstruct any cooling vents or openings and allow adequate space for air flow.
- Use only power connections supplied with the product or suitable equivalents.
- Do not modify the equipment in any way.
- For any mains powered appliances, ensure that the mains voltage is as described in the specifications.
- Keep powered products and batteries away from the reach of children.
- In case of malfunction, water ingress or other damage, consult qualified service personnel.
- Avoid pressure or impact to the housing that may result in damage when transporting or installing this product.
- For any Earthed mains product, ensure that the power supply has a protective Earth connection.
- Keep all packaging materials out of reach of children.
Indoor use only : The "House" symbol identifes electrical equipment designed primarily for indoor use.
Disposal : The "Crossed Wheelie Bin" symbol on the product means that the product is classed as Electrical or Electronic equipment and should not be disposed with other household or commercial waste at the end of its useful life. The goods must be disposed of according to your local council guidelines.
AVSL Group Ltd, Unit 2 Bridgewater Park, Taylor Road, Manchester, M41 7JQ, Unitied Kingdom
AVSL (EUROPE) Ltd, Unit 3D North Point House, North Point Business Park, New Mallow Road, Cork, Ireland