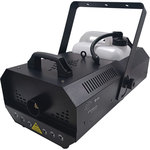
QTFX-2000 LED
QTFX-2000 LED: High Power Smart LED Fog Machine 2000W
160.478UK
Introduction
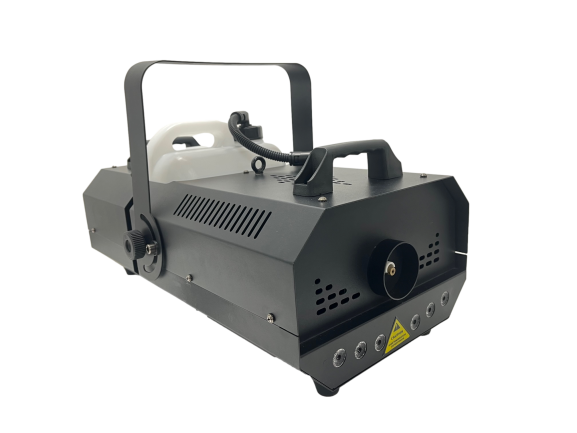
High output LED fog machine combining large area coverage and powerful delivery with 6 bright LEDs to provide an interesting and colourful fog display. The unit can be operated by either the control panel and LCD display on the back, additional RF remote control or 7-Channel DMX, making it ideal for larger sized events. The large capacity fluid tank holds up to 5.5 litres and is removable for clean and convenient refilling and the integrated low fluid protection switch ensures the unit can't be damaged if left running when the tank is empty.
 |
Caution: Please read this manual carefully before operating |
|---|---|
| Damage caused by misuse is not covered by the warranty | |
 |
Unpacking
Your QTFX-2000LED should reach you in good condition and should be supplied with IEC mains lead(s), wireless plug-in receiver/key fob remote, mounting bracket/thumbscrews and user guide. If there are any signs of damage or items missing from the packaging, contact your dealer immediately.
Warning
To prevent risk of fire or electric shock, do not expose electrical parts to rain or moisture. If liquids are spilled on areas other than inside the fluid tank, disconnect the mains, allow the QTFX-2000LED to dry out and have it checked by qualified service personnel before further use. Avoid any impact, dropping or extreme pressure to the housing. No user serviceable parts inside - do not open the case. Allow the QTFX-2000LED to acclimatize to room temperature before operating. Refer all servicing to qualified service personnel.
Safety
- Check for correct mains voltage and condition of the IEC lead before connecting to a power outlet.
- Check the condition of the remote lead and ensure that it is not trapped.
- This unit uses a heating element – be aware that parts of the housing may be hot whilst in use!
- This unit must be earthed.
Cleaning
- Use a soft dry or slightly damp to clean the casing.
- Do not use strong solvents for cleaning the unit.
- Clean the fog mechanism periodically by operating with distilled water instead of fog fluid.
- It is also recommended to use fog machine cleaning fluid (160.670UK) periodically.
Placement
The QTFX-2000LED has a built-in fluid container and should be operated in an upright position. Ensure that the unit is positioned on a stable, non-slip surface. Allow adequate space for access to the controls and to avoid straining cables and connections. Position the unit with the outlet nozzle aimed towards the area where the effect is required but away from contact with people. When moving or carrying the QTFX-2000LED, always use the top-mounted handles.
Rear Panel
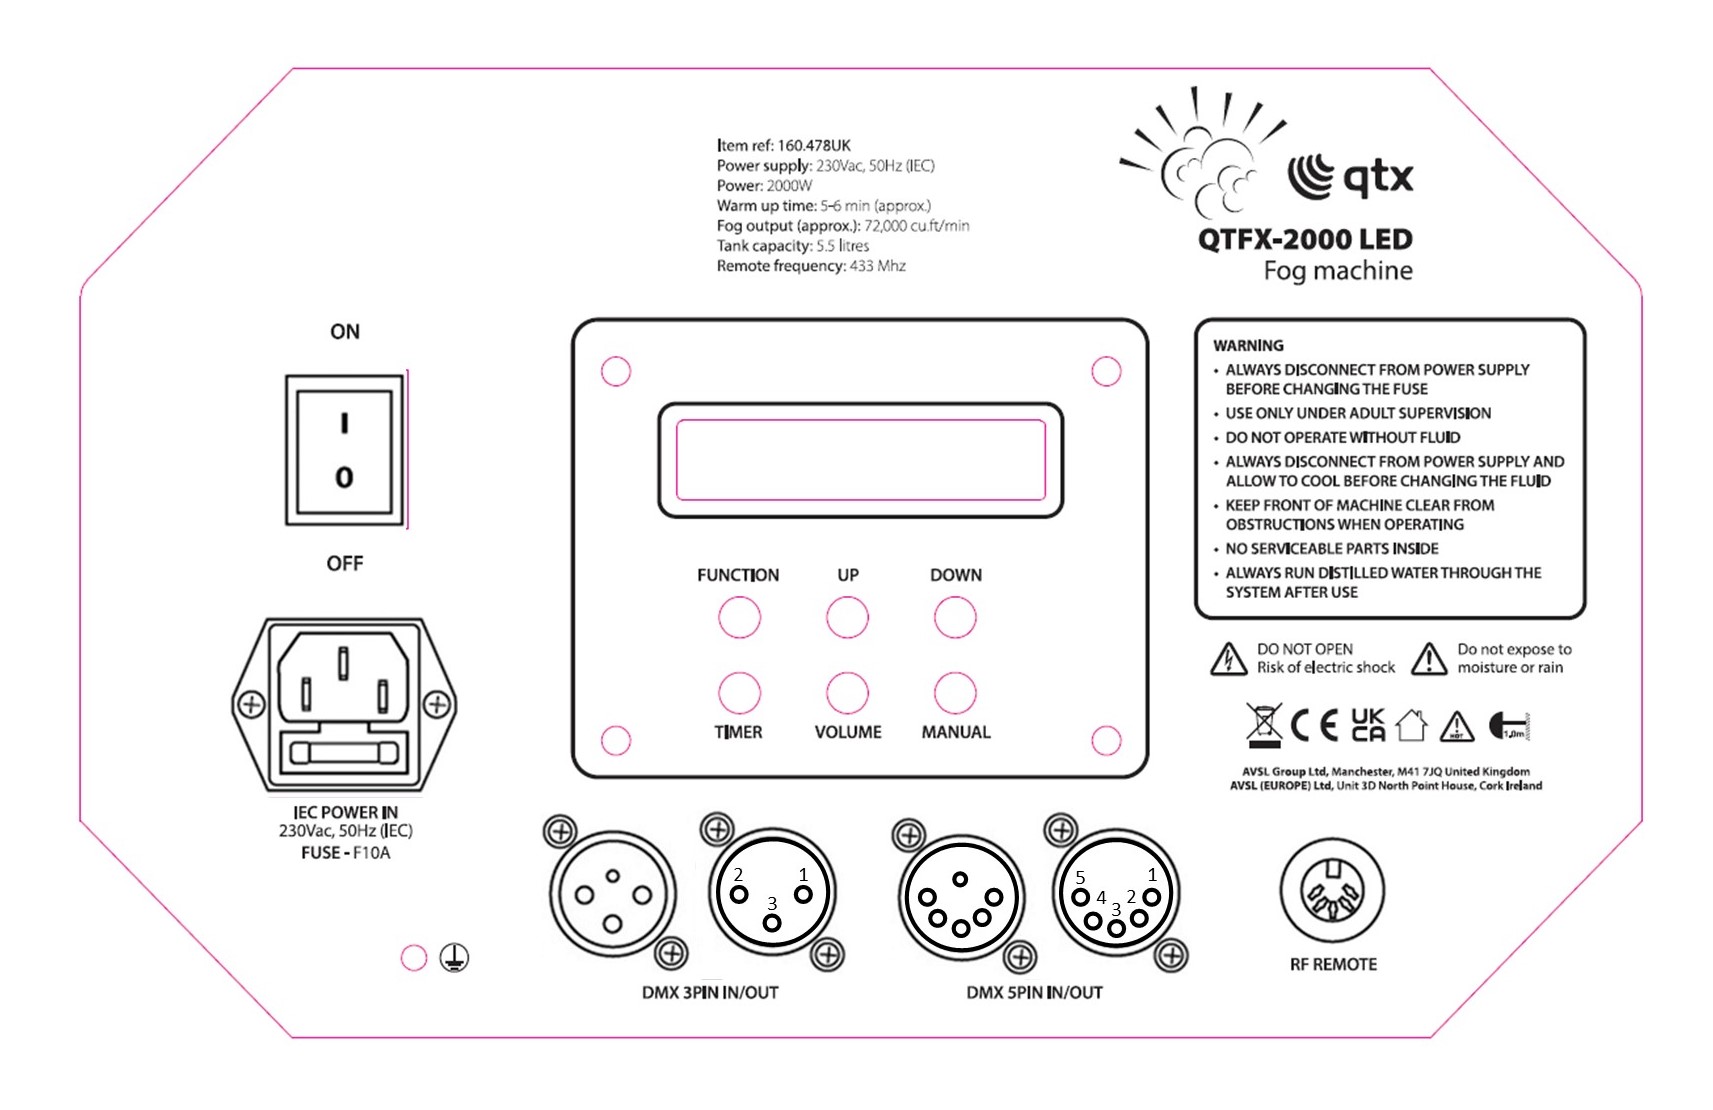
Rear panel controls:
Press the “Function” button to scroll through the available function screens of the unit.
Press the “Timer” button to set the required time span for the fog output.
Press the “Up” and “Down” buttons to increase and decrease the current selected value.
Press the “Volume” button to start and stop the fog effect. The display will read “Working” when the fog effect is in action.
Press and hold the “Manual” button to produce fog on demand. Note: the maximum time for this setting is 15 seconds, after this the machine will stop releasing fog effect.
Recommended Fluids:
For the QTFX-2000LED fog machine, we strongly recommend the following fluid which has been specifically formulated to perform best with any heater-based fog machines.
| QTX ref code | Description | Size |
|---|---|---|
| 160.583UK | High quality fog fluid pink | 5 Litre |
| 160.589UK | Premium fog fluid clear | 5 Litre |
Setting Up
Unscrew the top cap of the fog fluid tank and remove to fill with the selected fog fluid.
Replace the cap and close securely, ensuring the pipe is fed down to the bottom of the bottle so that a consistent flow of fluid is supplied to the machine.
Connect the supplied wireless remote receiver to the 5-pin DIN connector on the rear panel.
Connect the IEC mains lead supplied to the rear mains inlet.
If controlling via DMX, connect the incoming DMX control signal via the 3-pin or 5-pin XLR labelled DMX IN.
Connect any further DMX equipment to the relevant XLR outlet labelled DMX OUT.
Set the DMX start address using the rear control panel.
Switch the mains power on and the machine will begin to heat up and display “Warming up”. Heat up time for fog effect is usually between 8-10 minutes. When the machine is ready for use “Ready to fog” will be displayed.
During prolonged use, periodically check that the fluid level is not empty.
Switch off when not in use. Unplug from mains if not in use for long periods.
This unit is fitted with a failsafe to prevent damage to the pump and heater when the fluid levels are exhausted. When the screen displays “No Fluid” you need to reset the unit before topping up and using again.
Warning: There will be hot surfaces on the housing even after the machine is switched off
Menu Display Instructions
On start up the display will read “Warming Up”, when it is ready to fog it will display “Ready To Fog”
Interval Set: Fog interval timing set up (1-200s)
Duration Set: Fog duration timing set up: (1-200s)
DMX 512 Add: DMX address setup (1-512)
Volume Out: Select the required fog volume (1-100)
Red Colour: Select the required brightness (0-253)
Green Colour: Select the required brightness (0-253)
Blue Colour: Select the required brightness (0-253)
Glint: Select strobe effect - slow to fast (0-255)
Skip: Select colour skip speed - slow to fast (0-255)
Gradual: Select colour fade speed - slow to fast (0-255)
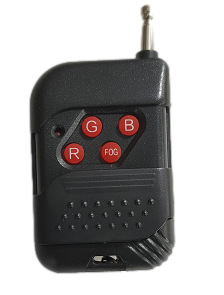
Wireless Remote Control
- R: Red LED control
- G: Green LED control
- B: Blue LED control
- FOG: Press and release for fog on demand
DMX operation
| Channel | Value | Content |
|---|---|---|
| CH1 | 0-5 | No fog |
| 6-255 | Fog low to high | |
| CH2 | 0-5 | Invalid |
| 6-255 | Red LED low to high | |
| CH3 | 0-5 | Invalid |
| 6-255 | Green LED low to high | |
| CH4 | 0-5 | Invalid |
| 6-255 | Blue LED low to high | |
| CH5 | 0-5 | Invalid |
| 6-255 | Strobe effect slow to fast | |
| CH6 | 0-5 | No LED effect |
| 6-127 | LED color changing mode | |
| 128-255 | LED gradual change mode | |
| CH7 | 0-255 | LED effect speed slow to fast |
Troubleshooting
Warning: Hot components! ... Switch off and allow to cool before touching the unit.
| Issue | Solution |
|---|---|
| No light on mains switch | Check mains voltage is correct and socket is switched on |
| Check IEC lead is OK and connected properly | |
| Check mains fuse in IEC connector and fuse in plug top | |
| If fuse blowing repeatedly, refer to qualified service personnel | |
| Ready message is on but no fog output | Check fog fluid level |
| If fluid is OK and pump working, the lines may be blocked | |
| Check that nozzle is not blocked or obstructed | |
| If blocked, clean with fog machine cleaner & distilled water | |
| No response to DMX | Check that XLR leads are connected properly |
| Check that DMX signal is OK by testing on other equipment | |
| Check the DMX settings are set to the correct address | |
| Ensure that the other remote control is not overriding DMX | |
| No LED output | Check LED settings on rear control panel |
| Check LED is not switched off on RF remote |
Specification
| Specification | Value |
|---|---|
| Power supply | 230Vac, 50Hz (IEC) |
| Fuse | F10A |
| Power | 2000W |
| Warm up time | 5 to 6 mins (approx.) |
| Fog output (approx.) | 72,000 cu.ft/min |
| Fluid capacity | 5.5 litres |
| LED : power | 3W x 6pcs |
| Remote frequency | 433 Mhz |
| DMX connection | XLR (3-pin/5pin) in/out (6-channel) |
| Dimensions | 550 x 280 x 280mm |
| Weight | 10kg |
Precautions
| CAUTION | ||
| RISK OF ELECTRIC SHOCK DO NOT OPEN | ||
| CAUTION : TO REDUCE THE RISK OF ELECTRIC SHOCK, DO NOT REMOVE COVER (OR BACK) NO USER-SERVICEABLE PARTS INSIDE REFER SERVICING TO QUALIFIED SERVICE PERSONNEL | ||
This symbol indicates that dangerous voltage constituting a risk of electric shock is present within this unit
This symbol indicates that there are important operating and maintenance instructions in the literature accompanying this unit
Safety Notice
- Prior to use, read through this safety guide.
- Pay attention to safety warnings.
- Observe all operating requirements.
- For any items designed for indoor use only, do not operate near water or in humid environments.
- For cleaning, only use a lint-free, dry cloth.
- Install according to the specifications.
- Place away from heat sources or heating appliances.
- During placement, ensure adequate support for the product and access to controls and connectors.
- Do not obstruct any cooling vents or openings and allow adequate space for air flow.
- Use only power connections supplied with the product or suitable equivalents.
- Do not modify the equipment in any way.
- For any mains powered appliances, ensure that the mains voltage is as described in the specifications.
- Keep powered products and batteries away from the reach of children.
- In case of malfunction, water ingress or other damage, consult qualified service personnel.
- Avoid pressure or impact to the housing that may result in damage when transporting or installing this product.
- For any Earthed mains product, ensure that the power supply has a protective Earth connection.
- Keep all packaging materials out of reach of children.
Indoor use only : The "House" symbol identifes electrical equipment designed primarily for indoor use.
Disposal : The "Crossed Wheelie Bin" symbol on the product means that the product is classed as Electrical or Electronic equipment and should not be disposed with other household or commercial waste at the end of its useful life. The goods must be disposed of according to your local council guidelines.
AVSL Group Ltd, Unit 2 Bridgewater Park, Taylor Road, Manchester, M41 7JQ, Unitied Kingdom
AVSL (EUROPE) Ltd, Unit 3D North Point House, North Point Business Park, New Mallow Road, Cork, Ireland