QTFX-2000 mkII
QTFX-2000 mkII: High Power Fog Machine 2000W
160.473UK
Introduction
Thank you for choosing the QTFX-2000 mkII fog machine for stage and events special effects. This product is designed to produce high power fog effects for stage and theatre shows. Please read these instructions fully in order to gain the best results from this item and avoid damage to the unit through misuse.
Unpacking
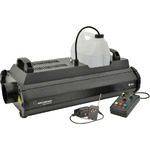
Your QTFX-2000 mkII should reach you in good condition and should be supplied with IEC mains lead(s), wired remote timer control, wireless plug-in receiver and key fob remote. If there are any signs of damage or items missing from the packaging, contact your dealer immediately.
Warning
To prevent risk of fire or electric shock, do not expose electrical parts to rain or moisture.
If liquids are spilled on areas other than inside the fluid tank, disconnect the mains, allow the QTFX-2000 mkII to dry out and have it checked by qualified service personnel before further use.
Avoid any impact, dropping or extreme pressure to the housing.
No user serviceable parts inside - do not open the case.
Allow the QTFX-2000 mkII to acclimatize to room temperature before operating.
Refer all servicing to qualified service personnel.
Warning: Hot components! ... Switch off and allow to cool before touching the unit.
Safety
- Check for correct mains voltage and condition of the IEC lead before connecting to a power outlet
- Check the condition of the remote lead and ensure that it is not trapped
- This unit uses a heating element – be aware that parts of the housing may be hot whilst in use
- This unit must be earthed
Cleaning
- Use a soft dry or slightly damp to clean the casing
- Do not use strong solvents for cleaning the unit
- Clean the fog mechanism periodically by operating with distilled water instead of fog fluid
- It is also recommended to use fog machine cleaning fluid (160.670UK) periodically
Placement
The QTFX-2000 mkII has a built-in fluid container and should be operated in an upright position. Ensure that the QTFX-2000 mkII is positioned on a stable, non-slip surface. Allow adequate space for access to the controls and to avoid straining cables and connections.
When moving or carrying the QTFX-2000 mkII, use the top-mounted handles.
Rear Panel
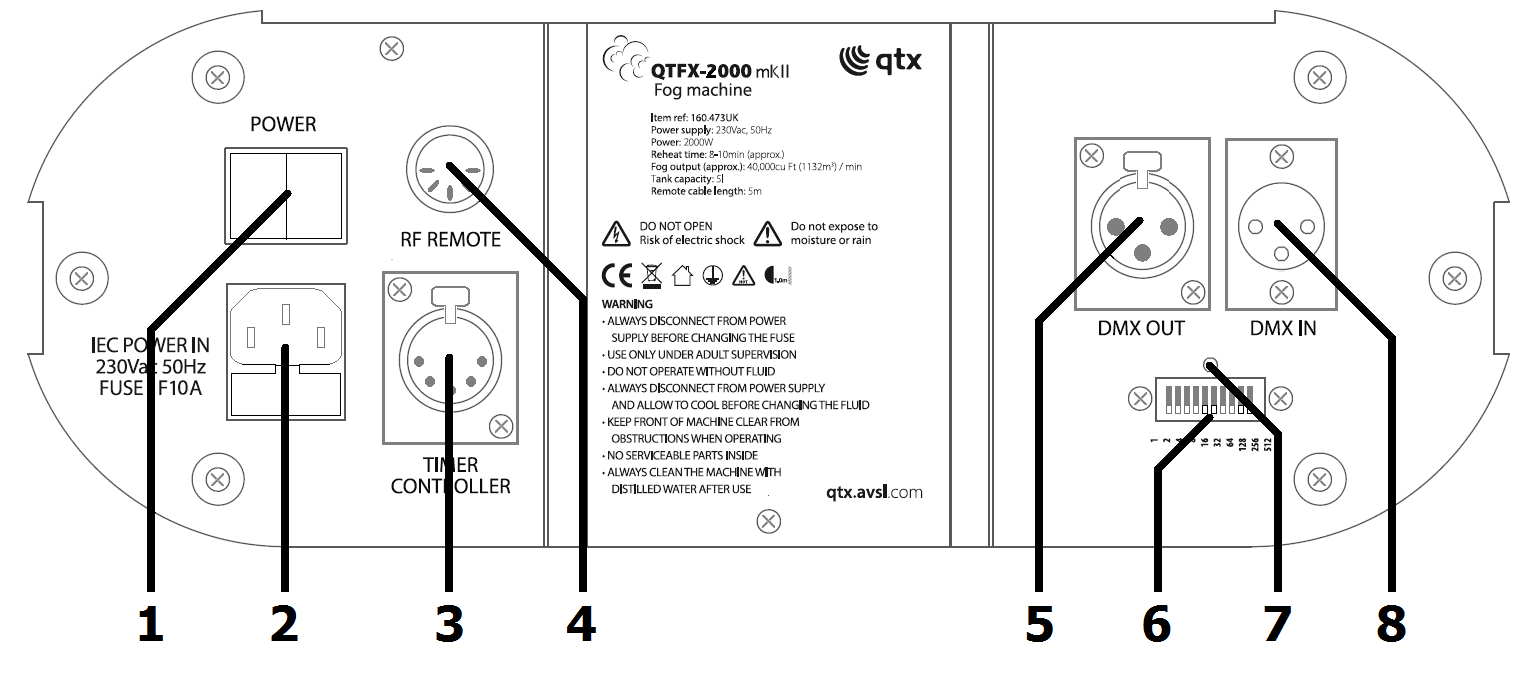
- Mains power on/off rocker switch
- IEC mains inlet & fuse holder
- Remote timer control connection (5-pin XLR)
- Wireless remote receiver connection (5-pin DIN)
- DMX out connection (3-pin XLR)
- DMX channel setting DIP switches
- DMX activity indicator
- DMX in connection (3-pin XLR)
Setting Up
The QTFX-2000 mkII requires fog fluid to create the effect. It is recommended to use one from the range of qtx fog fluids for best results. A chart for recommended fluids is included further along in this document.
- Unscrew the top cap of the fog fluid tank and remove to fill with the selected fog fluid.
- Replace the cap and close securely, ensuring the pipe is fed down to the bottom of the bottle so that a consistent flow of fluid is supplied to the machine
- Alternatively, a fresh 5l bottle of fluid can be inserted as a direct replacement.
- Connect the remote timer control to the 5-pin XLR connector on the rear panel (3).
- Connect the supplied wireless remote receiver to the 5-pin DIN connector (4) on the rear panel.
- Connect the IEC mains lead supplied to the rear mains inlet (2).
- If controlling via DMX, connect the incoming DMX control signal via the 3-pin XLR labelled DMX IN (8).
- Connect any further DMX equipment to the XLR labelled DMX OUT (5).
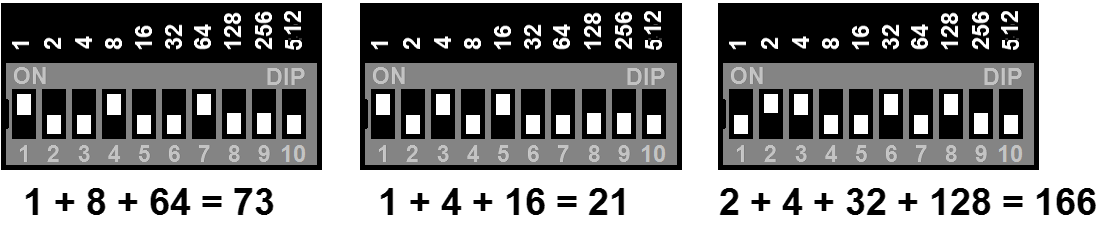
- Set the DMX start address using the rear panel DIP switches (6) in binary number format.
Examples are shown below…
Setting Up
- Make sure that none of the remote timer control buttons are pressed in at startup.
- Aim the outlet nozzle toward the area where the effect is required but away from contact with people.
- Switch the mains power on (1).
- Heat up time for fog effect is usually between 8-10 minutes.
- During prolonged use, periodically check that the fluid level is not empty.
- Switch off when not in use. Unplug from mains if not in use for long periods.
Warning: There will be hot surfaces on the housing even after the machine is switched off.
Remote Control
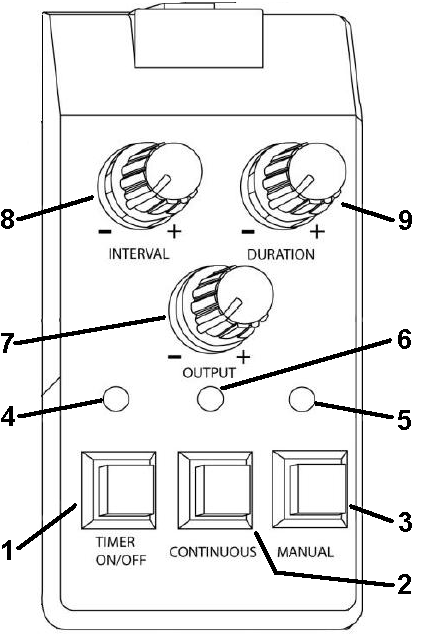
- Timer button (latching)
- Continuous button (latching) – overrides timer control for constant fog
- Manual button (non-latching) – overrides timer control for fog on demand
- Timer indicator – illuminated when timer function is active
- Ready indicator – illuminated when heated up ready to produce fog
- Continuous indicator – illuminated when continuous function is active
- Output control – adjusts the amount and density of fog effect
- Interval control – adjusts the interval between fog output on timer control
- Duration control – adjusts the time length of fog output on timer control
- When the machine is ready to operate, the ready light (5) on the remote timer control will illuminate.
- You may now press the Manual (3) button for fog on demand – releasing button stops the fog effect.
- When the ready indicator is off, the QTFX-2000 mkII needs time to re-heat and will not produce fog.
- For constant fog effect, use the latching Continuous (2) button and the Continuous LED (6) will light.
- The density of fog effect can be varied by adjusting the rotary Output control (7).
- Pressing the Timer button (1) will activate the hands-free timer function and the timer LED (4) will light.
- The Interval control (8) adjusts the time between fog effect output in each timer cycle.
- The Duration control (9) adjusts the length of time that fog is produced in each timer cycle.
Wireless Remote Control
- Fog can also be controlled manually by the wireless remote control.
- The key fob remote is powered by a button cell, replace this with similar type if discharged.
- Extend the antenna on the key fob, slide down the front cover
- Press one of the key fob buttons to produce fog.
DMX Operation
The QTFX-2000 mkII can be operated by a single channel of DMX512 control. Set this address via the rear panel DIP switches as shown above A value of 0 will give no fog output. A value between 1 and 255 will give full fog output. When a DMX signal is detected, the DMX indicator (7) will flash when data is being received.
Troubleshooting
| Issue | Solution |
|---|---|
| No light on mains switch | Check mains voltage is correct and socket is switched on |
| Check IEC lead is OK and connected properly | |
| Check mains fuse in IEC connector and fuse in plug top | |
| If fuse blowing repeatedly, refer to qualified service personnel | |
| Ready light stays off | Check remote is connected properly |
| If light is permanently off, refer to qualified service personnel | |
| Ready light is on but no fog output on manual or continuous | Check fog fluid level |
| If fluid is OK and pump working, the lines may be blocked | |
| Check that nozzle is not blocked or obstructed | |
| If blocked, clean with fog machine cleaner & distilled water | |
| No fog output on timer function | Ensure timer button is pressed in and timer LED is lit |
| Check interval, duration and output control settings – test manually if necessary | |
| No response to DMX | Check that XLR leads are connected properly |
| Check that DMX signal is OK by testing on other equipment | |
| Check that the DIP switch settings are set to the correct address | |
| Ensure that the other remote controls are not overriding DMX |
Precautions
Indoor use only : The "House" symbol identifes electrical equipment designed primarily for indoor use.
Disposal : The "Crossed Wheelie Bin" symbol on the product means that the product is classed as Electrical or Electronic equipment and should not be disposed with other household or commercial waste at the end of its useful life. The goods must be disposed of according to your local council guidelines.
AVSL Group Ltd, Unit 2 Bridgewater Park, Taylor Road, Manchester, M41 7JQ, Unitied Kingdom
AVSL (EUROPE) Ltd, Unit 3D North Point House, North Point Business Park, New Mallow Road, Cork, Ireland