QTFX-LF900
QTFX-LF900 low level fogger
160.447UK
Introduction
Thank you for choosing the QTFX-LF900 low level fog machine as part of your stage effects setup. This machine is designed to emulate low lying dry ice effects using cooled fog fluid.
Please read and keep this manual to ensure maximum performance and avoid damage through misuse.
Unpacking
Your QTFX-LF900 should reach you in good condition and should be supplied with IEC mains lead(s) and a wired handheld remote control. If there are any signs of damage or items missing from the packaging, contact your dealer immediately.
Warning
To prevent risk of fire or electric shock, do not expose electrical parts to rain or moisture.
If liquids are spilled on the housing or through the vents, disconnect the mains, allow the QTFX-LF900 to dry out and have it checked by qualified personnel before further use.
Avoid any impact, dropping or extreme pressure to the housing.
No user serviceable parts inside - do not open the case (other than to access the ice reservoir)
Refer all servicing to qualified service personnel.
Placement
- The QTFX-LF900 has an ice reservoir and fluid tank, so should be operated in the upright position only.
- Choose a position where the fog output nozzle is not obstructed and is facing the general area to be filled.
- Ensure easy access to the rear panel, fluid tank and ice reservoir
Safety
- Check for correct mains voltage and condition of IEC lead before connecting to power outlet.
- Check the condition of the remote lead and ensure that it is not trapped.
- This unit must be earthed.
Cleaning
- Use a soft dry or slightly damp cloth to clean the casing.
- Do not use strong solvents for cleaning the unit.
- It is recommended to use fog machine cleaning fluid (160.670UK) periodically.
Setting Up
The QTFX-LF900 requires fog fluid and ice (water ice) to produce the effect. It is recommended to use qtx low level fog fluid for best results (160.592UK, 160.593UK) This fluid is specially formulated to achieve a dense, low lying fog effect. A chart for recommended fog fluids is included further along in this document.
- Unscrew the top cap of the tank and fill with the recommended smoke fluid.
- Screw the cap securely ensuring the pipe is fed down to the bottom of the bottle so a consistent flow of fluid is supplied to the machine.
- Unscrew the safety screw on top panel to open and fill the reservoir with no more than 5kg of ice.
- Close the top panel and secure the safety screw.
- Connect the remote control via the 5-pin connector on the rear panel.
- Connect the IEC mains plug, ensuring correct supply voltage.
Layout
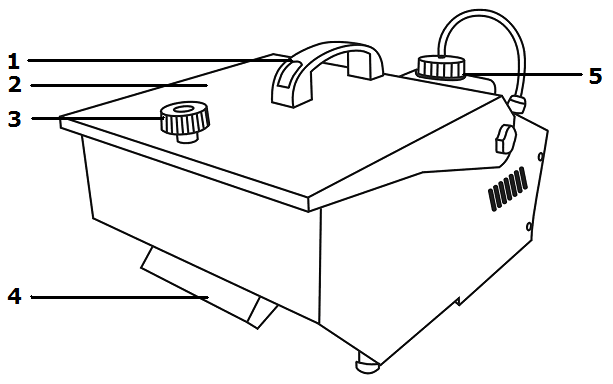
- Carry Handle
- Top panel lifts up for loading the ice
- Safety screw to secure top panel
- Fog output nozzle
- Fluid bottle.
(Note: the fluid bottle cannot be removed)
Rear Panel
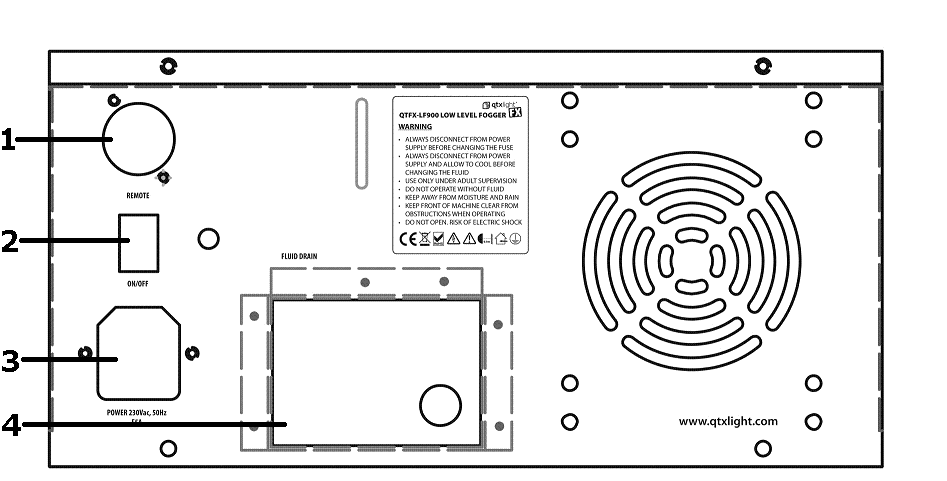
- Remote control connection
- Power ON/OFF
- IEC mains inlet and fuse holder
- Fluid drain tap.
Remote control / timer control
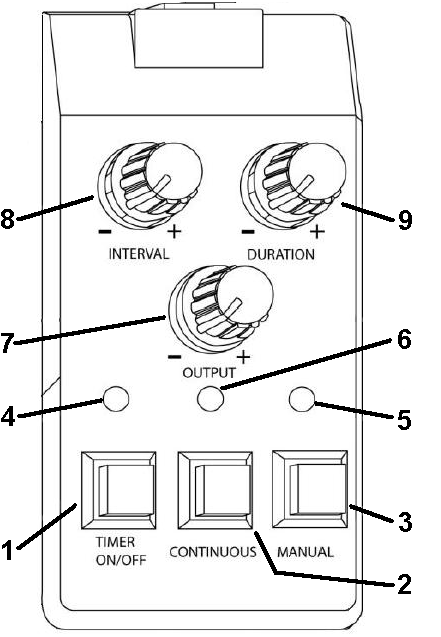
- Timer on/off button
- Continuous output
- Manual override button
- Timer LED indicator (Illuminated when timer active)
- Manual ready indicator
- Continuous LED indicator (Illuminated when continuous active)
- Adjust the amount of fog is released (0 – 100%).
NOTE The below controls are only used in timer mode
- Adjust the interval gap between each release of Fog (between 0 – 30 Min approximately)
- Adjust the duration the Fog is released at each interval (between 0 – 15 seconds approximately).
Operation
- Switch on the power switch on the rear panel.
- Heat up time is usually around 4 minutes. Please ensure no button is pressed during the heat up time.
- When the machine is ready the LED light on the remote control will illuminate
- Press the Manual Override button on the remote control for 5 seconds so the fluid has a chance to flow through the heater block making it ready to use.
- After this you will be able to use the machine. It is recommended to produce smoke with small pauses in between so that the temperature is maintained and the thermostat doesn’t switch off.
- After use, drain the melted ice using the fluid drain tap on the rear panel.
Remote Control
Manual override switch on the remote control is a non-latching “fog on demand” switch. Continuous switch is latching and produces constant fog as long as the heater is up to temperature.
Timer control can be set to various intervals and burst lengths to give consistent output over a period of time
Replacing The Fuse
Disconnect from the main power supply first, then remove the fuse holder part of the IEC socket to reveal the fuse. Replace the correct fuse rating as stated on the panel. Lock the fuse holder cover back into place.
General Maintenance
To maintain optimum performance and minimize wear, the item should be cleaned frequently. Usage and environment are contributing factors in determining frequency. As a general rule, fixtures should be cleaned after each use to avoid dust build-up and blockages, which can result in poor performances, overheating and breakages. Be sure to disconnect the mains before conducting maintenance.
Clean the external case when the fixture is cold with a dry cloth or tissue.
It is recommended to use fog machine cleaning fluid (160.670UK) periodically.
Precautions
Indoor use only : The "House" symbol identifes electrical equipment designed primarily for indoor use.
Disposal : The "Crossed Wheelie Bin" symbol on the product means that the product is classed as Electrical or Electronic equipment and should not be disposed with other household or commercial waste at the end of its useful life. The goods must be disposed of according to your local council guidelines.
AVSL Group Ltd, Unit 2 Bridgewater Park, Taylor Road, Manchester, M41 7JQ, Unitied Kingdom
AVSL (EUROPE) Ltd, Unit 3D North Point House, North Point Business Park, New Mallow Road, Cork, Ireland
Legacy Product
160.447UK was discontinued 28/10/2024 and is no longer available from AVSL