PB-1214
LED PAR Bar System
151.556UK
Introduction
This lightweight, versatile PAR bar system is prefect for mobile DJs and performers who need their lighting to be quick to set up and easily transportable. 4 PAR Cans are each loaded with 12 LEDs in red, green, blue and white for super smooth colour blending.
Features
- Red, green, blue and white colour mixing
- Quick and simple fold away design allows for easy transportation
- Can be controlled by the rear panel, the remote control or DMX
- 12 pre-programmed auto modes and sound-to-light
- Built-in static or automated programs
- Master/slave mode
- Includes PAR bar, tripod stand, remote controller and transport case
- We recommend that this product is used within the guidelines HSG95
DMX-512 Connection
If you are using a standard DMX controller, you can connect the DMX output from the controller directly to the DMX input of the first unit in the DMX chain. Connect the DMX output of the first unit in a DMX chain with the DMX input of the next unit in the chain. Always connect the output of one unit with the input of the next unit until all units are connected.
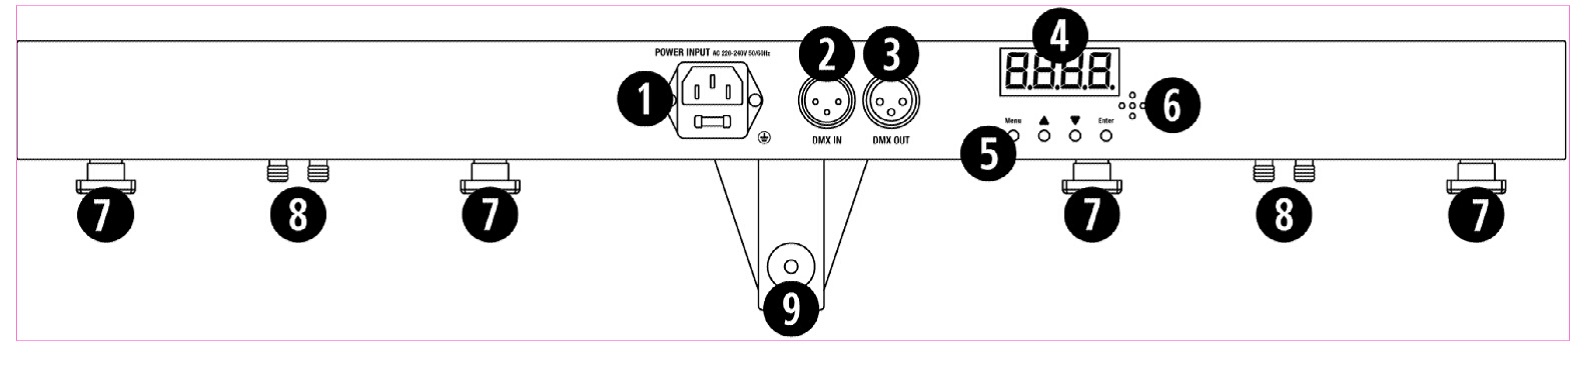
| Number | Item | Function |
|---|---|---|
| 1 | Power supply input | Attach the IEC mains cable here. |
| 2 | DMX input | 3 pin XLR connector for DMX 512 input communication. |
| 3 | DMX output | 3 pin XLR connector for DMX512 output communication. |
| 4 | LED display | LED function display and menu buttons to control the operating mode of the unit. |
| 5 | MENU buttons | MENU function buttons: Menu, Up, Down, Enter |
| 6 | Microphone | Built-in microphone for Sound-to-Light operation. |
| 7 | Par can mounts | Attach the par can lights to the controller bar |
| 8 | Par can connections | Attach the par can cables to the controller bar |
| 9 | Light stand socket | Tighten screw to secure the controller bar to the light stand. |
Function Settings
Using the four function buttons on the controller bar you can set the operating mode of the unit. Press the ‘Menu’ button to display the different functions (see table below for a description of the functions). Use the ‘Up’ ‘Down’ arrow buttons to make your selection. When you have chosen your desired function, press the ‘Enter’ button to confirm the selection.
| Sequence Number | Display | Sub-Menu | Function/Action |
|---|---|---|---|
| 1 | d001 – d512 | 001–512 | DMX address setting |
| 2 | IP.01 – IP.64 | 001–512 | IP mode |
| 3 | A1.01 | A1.01 – A1.18 | Static Colour. Select one of 18 colour options |
| 4 | A2.01 | A2.01 – A2.32 | Colour Jump. A2.01 (slowest) – A2.32 (fastest) |
| 5 | A3.01 | A3.01 – A3.19 | Multi Colour. Different colour selection available |
| 6 | A4.01 | A4.01 – A4.04 | Sound to Light Function |
| 7 | A5.01 | A5.01 – A5.32 | Strobe Function. A5.01 (slowest) – A5.32 (fastest) |
| 8 | r000 – r255 | Adjust red colour intensity. r000 (off) – r252 (brightest) | |
| 9 | G000 – G255 | Adjust green colour intensity. G000 (off) – G252 (brightest) | |
| 10 | b000 – b255 | Adjust blue colour intensity. b000 (off) – b252 (brightest) | |
| 11 | u000 – u252 | Adjust white colour intensity. u000 (off) – u252 (brightest) |
DMX address setting
When controlling the unit (or units) with a DMX controller, each one must be set with a specific DMX address. You can choose to set all units with the same DMX address (usually d001) or you can set every unit with its own DMX address. If all units are set with the same DMX address all units will be synchronised and operate in the same way.
If you set each unit with a different DMX address, they will receive the DMX signal from their own DMX address. You will now be able to control each unit individually. The DMX address that you set for each unit must be determined by the number of channels. The PB-1214 has 8 DMX channels, therefore you should set the starting address of the first unit to 1 (d001), the second unit must be set to 9 (d009) being 1+8, the third to 17 (d017) being 9+8, the fourth to 25 (d025) being 17+8 and so on.
| Channel | DMX Value | Function |
|---|---|---|
| 1 | 0–10 | Macro A1 |
| 11–50 | Macro A2 | |
| 51–100 | Macro A3 | |
| 101–150 | Macro A4 | |
| 151–200 | Macro A5 | |
| 201–209 | Red + Green + Blue | |
| 210–255 | Reserved / Other Function | |
| 2 | 0–255 | Macro Colour |
| 3 | 0–255 | Speed Adjustment |
| 4 | 0–255 | Master Dimmer |
| 5 | 0–255 | Red Dimmer |
| 6 | 0–255 | Green Dimmer |
| 7 | 0–255 | Blue Dimmer |
| 8 | 0–255 | White Dimmer |
Remote Control Operation
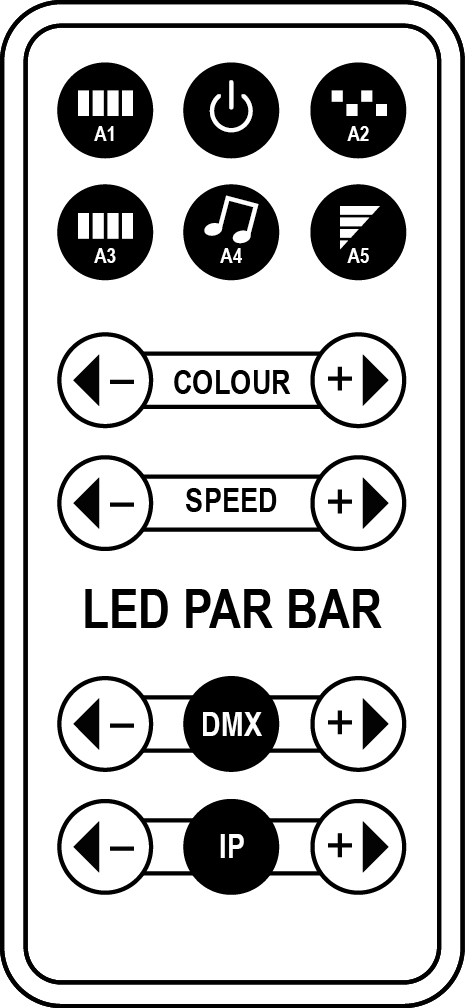
- [A1] all lights on
- [-] Power on/off
- [A2] colour jump change
- [A3] colour gradual change
- [A4] sound activated mode
- [A5 ]strobe mode
- [COLOUR -/+] colour adjustment
- [SPEED -/+] speed adjustment
- [DMX -/+] DMX channel selection
- [IP -/+] running effect
Precautions
Indoor use only : The "House" symbol identifes electrical equipment designed primarily for indoor use.
Disposal : The "Crossed Wheelie Bin" symbol on the product means that the product is classed as Electrical or Electronic equipment and should not be disposed with other household or commercial waste at the end of its useful life. The goods must be disposed of according to your local council guidelines.
AVSL Group Ltd, Unit 2 Bridgewater Park, Taylor Road, Manchester, M41 7JQ, Unitied Kingdom
AVSL (EUROPE) Ltd, Unit 3D North Point House, North Point Business Park, New Mallow Road, Cork, Ireland
